Enigma
Boss Information
Health: 559.9M (5/7/16)
Enrage Timer: 11 minutes or running out of space
Difficulty: 6/10
DPS Requirement: ~1 M
Enrage Timer: 11 minutes or running out of space
Difficulty: 6/10
DPS Requirement: ~1 M
Raid Setup
- 1 Tank
- 1 Tank Healer (Puri/sent recommended; Build located here)
- 3-4 Raid Healers (Liberator(s) recommended)
- 1 Bard
- 1 Archon
- 1 Beastmaster
- 1 Defiler
- 10-11 DPS (melee recommended)
Phase One: 100%-60%
Boss Mechanics
General mechanics
Range buff: Reaching the platform grants the ability to hit Enigma from any range with melee attacks while on the platform. Make sure everyone has this before the pull. Makes ninja pulling super easy.
Cleave: 180° frontal cleave. 6s cast. Only the tank survives this.
Breaking End: Interruptable Cast. Kills people.
Meteor: Pulsing AOE. Shares damage with nearby raid members. Stack up.
Emission of Turmoil: 3s cast followed by 4 channel. Raid damage and needs AOE cleanse. Use cooldowns.
Overwhelming Force: 3s cast followed by 3s channel. The channel deals massive damage to the tank. Use cooldowns. Reoccurs every 30-40 seconds.
Chaos Flames: AOE on the tank. He needs to drop these without turning the boss (because of Cleave). A square shape is recommended.
Aside from Chaos Flames (Phase One, Phase Three) these will happen throughout the entire fight.
1 minute into the fight he will begin Phase One specific mechanics:
Summon Pandemonium Obstruction: Summons Pandemonium Obstruction near the raid. Followed by Pnademonium.
Pandemonium: 15 second cast. Kills unless granted a buff from a killed Pandemonium Obstruction. Followed by Sunder.
Pandemonium Obstruction: Crystal with 15.2 million health. Spawns a white AOE once dead which protects from Pandemonium. Needs 2 interrupts for Repair Matrix(heals) and Reflective Barrier(absorbs). The tank needs to get the protection buff as well.
Sunder: 180° back cleave. 6s cast. Happens after Pandemonium. One shot at the end. Move out.
Pandemonium will happen until 60% every minute.
Phase Two: 60%-25%
Boss mechanics
Summon Chaos: Indicates the phase change. Spawns red and purple bubbles (sparks) around the the room.
Purple bubbles(Disintegration): Stationary. 90% damage if touched. Create "safe lanes".
Red bubbles: Rotate circular in 4 lanes. Deal damage if touched.
Lasers: Two rotating lasers coming out of his sides. One shots if touched. Anti-clockwise.
Hasten Sparks: Cast at 45%. Increases the speed of the red sparks.
He inherits all mechanics from the previous phase except Chaos Flames and Pandemonium.
Phase Three: 25%-0%
Boss Mechanics
Call to Chaos: Indicates the phase change.
Fragment of Chaos: Spawns two Fragments of Chaos at each side. They move towards the raid. Causes raid wipe if touched.
Orbs: Two Orbs will appear at each side before the first Fragment of Chaos. They grant 3 reactive abilities. The first (Suspend) roots a Fragment of Chaos, the second (Chaotic Pull) pulls a Fragment of Chaos and the third passes the abilities on to the target. You will only use 1 and 2.
The mechanics from Phase One are present including Chaos Flames.
Overall Flow
Strategy
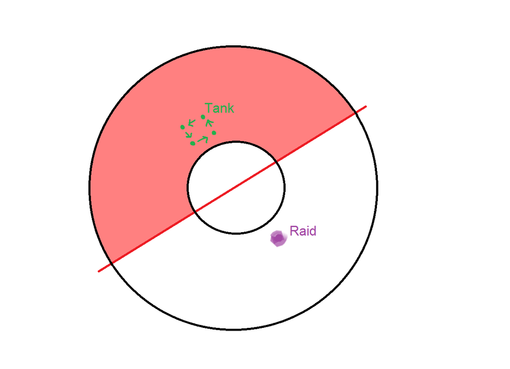
The tank needs to face Enigma away from the raid due to Cleave and drop Chaos Flames with minimal movement of the boss. He can survive Cleave easily.
Have the raid stack behind Enigma as tightly as possible to catch Meteor and Emission of Turmoil. The tank healer uses his cooldowns on the first Overwhelming Force (e.g. Healers Covenant) and the Defiler on the second (Unstable Transformation).
Kill (and interrupt) the crystal and get the protection buff (includes the tank). If you struggle to meet the DPS check save cooldowns for the crystals. As soon as he starts Sunder the tank moves to the left and the raid moves out to the right. It's important that tank and raid split up since a Cleave will follow soon after.
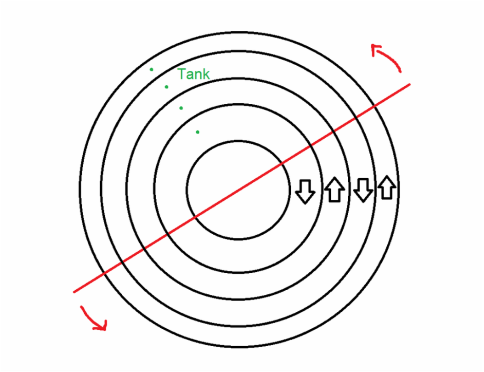
During phase two the tank needs to stay in the middle of the semi-circle created by the rotating laser because Cleave will persist thorugh this phase. The raid needs to move through the lanes only stopping for Emission of Turmoil and Meteor. You can safely stand behind a purple spark since they are stationary but not to long or you get trapped and killed by the lasers.
The last phase is similar to the first one. He will not cast Pandemonium but instead spawn the Fragments of Chaos. Assign two people to get the reactives and stacking up (pulling then rooting) the orbs as tightly as possible without them touching each other.
The tank needs to face Enigma away from the raid due to Cleave and drop Chaos Flames with minimal movement of the boss. He can survive Cleave easily.
Have the raid stack behind Enigma as tightly as possible to catch Meteor and Emission of Turmoil. The tank healer uses his cooldowns on the first Overwhelming Force (e.g. Healers Covenant) and the Defiler on the second (Unstable Transformation).
Kill (and interrupt) the crystal and get the protection buff (includes the tank). If you struggle to meet the DPS check save cooldowns for the crystals. As soon as he starts Sunder the tank moves to the left and the raid moves out to the right. It's important that tank and raid split up since a Cleave will follow soon after.
During phase two the tank needs to stay in the middle of the semi-circle created by the rotating laser because Cleave will persist thorugh this phase. The raid needs to move through the lanes only stopping for Emission of Turmoil and Meteor. You can safely stand behind a purple spark since they are stationary but not to long or you get trapped and killed by the lasers.
The last phase is similar to the first one. He will not cast Pandemonium but instead spawn the Fragments of Chaos. Assign two people to get the reactives and stacking up (pulling then rooting) the orbs as tightly as possible without them touching each other.
Vis and Misericordia (5/9) Lady Justice (7/9)
Useful Kalerts
Overwhelming Force
Breaking End
Reflective Barrier
Repair Matrix
Breaking End
Reflective Barrier
Repair Matrix
Loot Table
The loot table is complete, but is pending beautification. Please forgive our mess.
Note: All Nexian, Enigmatic, Ruin Forged and Nightmare Steel gear is convertable to Fortified (tank).
2 Items
1 Boot
1 Off-Hand
Boots
Nightmare Steel Greaves - Warrior - CP222
Ruin Forged Sabatons - Cleric - CP222
Enigmatic Leather Boots - Rogue - CP222
Nexian Silk Slippers - Mage - CP222
Off Hand (Possibly missing an item or two)
Nightmare Bulwark - Warrior Tank - BL380
Nightmare Steel Mace - Warrior DPS - CP270
Longblade of Horrid Insight - Warrior DPS - PC380
Ruin Forged Mace - Cleric DPS - CP270/SP3096
Anvil of Ruin - Cleric Tank - BL380
Nightmare Steel Broadsword - Rogue DPS - CP270
Dagger of Envy - Rogue DPS - PC380
Nexian Spellbinder - Mage DPS - SP3259
Nexian Spellblade - Mage DPS - CP281/SP3096
HTML Comment Box is loading comments...
