Hericius
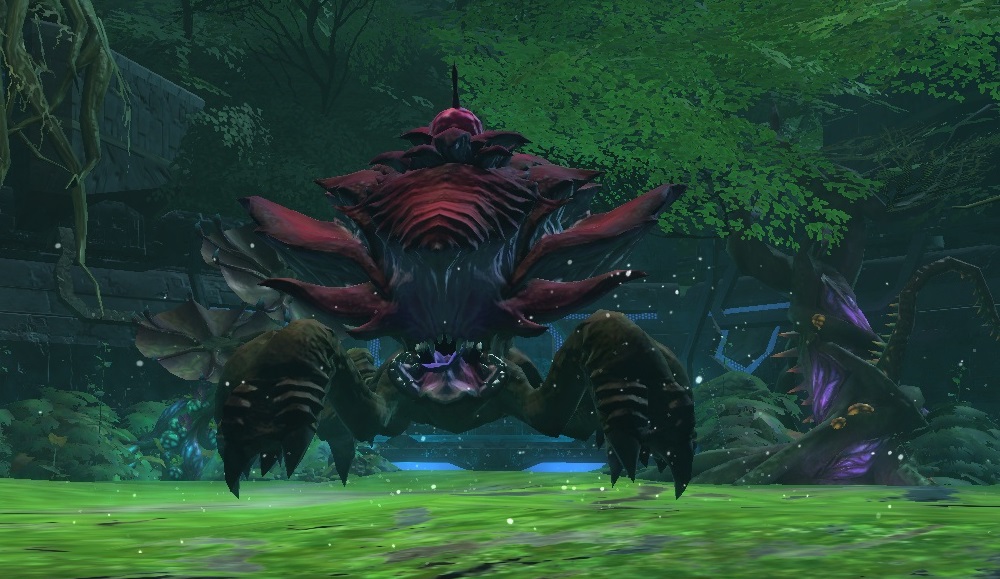
Boss Information
Health: 115.9M (EM) - 231.8M (NM) / 301.3M (HM) (All 5/27/2016)
Enrage: 7 minutes
Difficulty: 8/10
Required DPS: Scales by mode and adds.
Enrage: 7 minutes
Difficulty: 8/10
Required DPS: Scales by mode and adds.
Setup
- 1 Tank
- 2 Raid Healers
- 1 Archon
- 1 Bard or Oracle
- 5 DPS (non-cleave)
Boss Mechanics
Chlorolance: Interruptable cast. Aggro reset. Target can no longer produce aggro. Interrupt!
The Unseen Chism: Raid wipe mechanic. Triggered by another condition. Can be jumped over (think Finric or Dark Genisis).
Cleansing Siphon: Interruptable cast. Does something bad. Interrupt it. This is secondary to Chlorolance.
Call for Help: Hericius casts this at around 2 minutes. This will call 3 adds (see under add mechanic). These need to be tanked and killed. (Hericius doe NOT enrage if you kill all these adds. Just the three colored mushrooms.)
Red and Blue Lanes/waves: Shortly after Call for Help, lanes will show up on the ground. (Think Akylios in the Nightmare Tide NTE) Someone will need to hit the red mushroom to see the red lanes and the blue mushroom to see the blue lanes. Make your bard do it.
Shroommageddon: At 10% the three mushrooms heal to full and you have about 25 seconds to kill all three or wipe the raid. This is obviously a split raid DPS race mechanic. Split as evenly as possible. Colored Mushroom Health is 5.1M for all versions. Once Shroommageddon starts the invisible waves stop, so you don't have to worry about random deaths anymore.
He does not cleave. When he is not casting a Spore cast the raid damage is high based on the damage the tank is receiving. Having trouble healing it? Here's a nice discussion on the matter. LINK
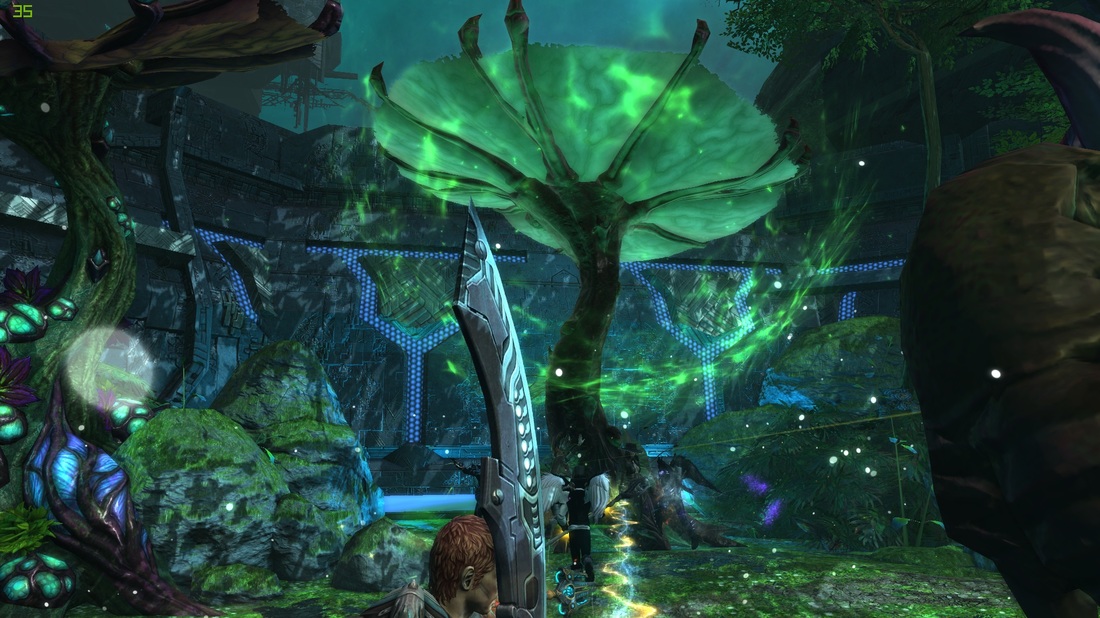
Once the boss is engaged, three Mushrooms will spawn at the edges of the area. When damaged they release a buff to surrounding players protecting them from different casts of the boss. Damaging a mushroom shall henceforth be called "licking". Killing one of the three colored mushrooms prior to Shroommageddon will cause Hericius to enrage. Ensure you're not using a cleave spec like Reaver or Riftblade anywhere near these mushrooms.
Soothing Mushroom (blue): When damaged grants immunity to Acidic Spores. Boss will Enrage if it dies. Also lets you see blue wave lanes.
Acidic Spores: Raid wipe mechanic. 10s cast. Kills the raid unless under the protection of a Frenetic Mushroom.
Frenetic Mushroom (green): When damaged grants immunity to Caustic Spores. Boss will Enrage if it dies.
Caustic Spores: Raid wipe mechanic. 10s cast. Kills the raid unless under the protection of a Caustic Mushroom.
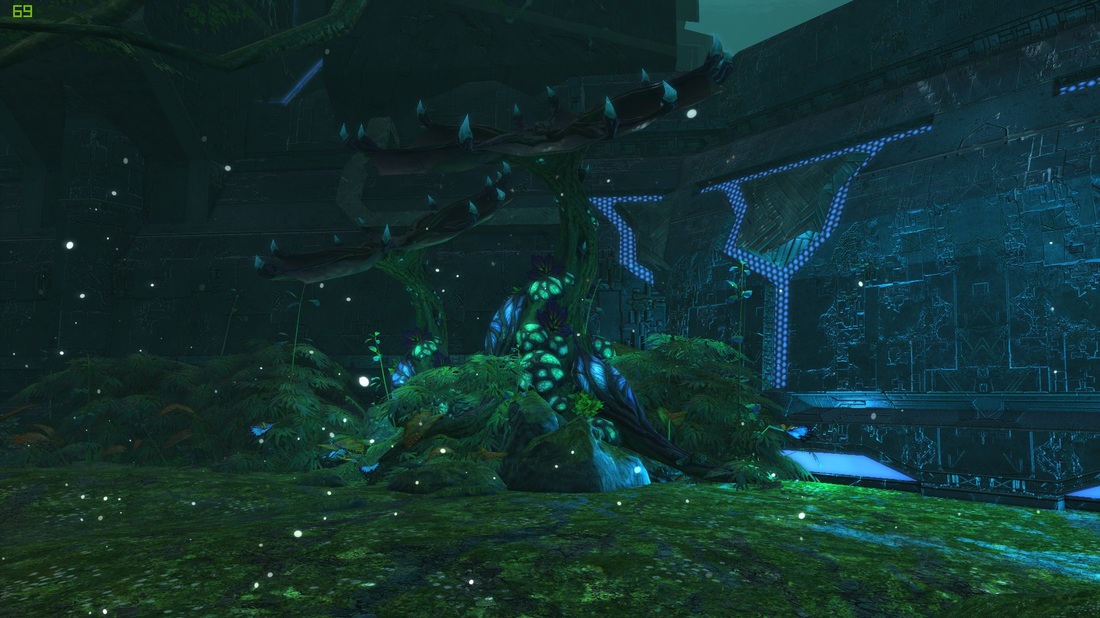
Smoldering Mushroom (Orange): When damaged grants immunity to Incendiary Spores. Boss will Enrage if it dies. Also lets you see red wave lanes.
Incendiary Spores: Raid wipe mechanic. 10s cast. Kills the raid unless under the protection of a Caustic Mushroom.
Usually the bard or tank licks (hit it one time only) the Mushrooms. Do it once and with the lowest damage possible. After 3-4 Mushrooms he will do Call for Help. It is advised the raid moves towards the safe spot(s) in order to avoid the waves. Read more below.
The Unseen Chism: Raid wipe mechanic. Triggered by another condition. Can be jumped over (think Finric or Dark Genisis).
Cleansing Siphon: Interruptable cast. Does something bad. Interrupt it. This is secondary to Chlorolance.
Call for Help: Hericius casts this at around 2 minutes. This will call 3 adds (see under add mechanic). These need to be tanked and killed. (Hericius doe NOT enrage if you kill all these adds. Just the three colored mushrooms.)
Red and Blue Lanes/waves: Shortly after Call for Help, lanes will show up on the ground. (Think Akylios in the Nightmare Tide NTE) Someone will need to hit the red mushroom to see the red lanes and the blue mushroom to see the blue lanes. Make your bard do it.
Shroommageddon: At 10% the three mushrooms heal to full and you have about 25 seconds to kill all three or wipe the raid. This is obviously a split raid DPS race mechanic. Split as evenly as possible. Colored Mushroom Health is 5.1M for all versions. Once Shroommageddon starts the invisible waves stop, so you don't have to worry about random deaths anymore.
He does not cleave. When he is not casting a Spore cast the raid damage is high based on the damage the tank is receiving. Having trouble healing it? Here's a nice discussion on the matter. LINK
Once the boss is engaged, three Mushrooms will spawn at the edges of the area. When damaged they release a buff to surrounding players protecting them from different casts of the boss. Damaging a mushroom shall henceforth be called "licking". Killing one of the three colored mushrooms prior to Shroommageddon will cause Hericius to enrage. Ensure you're not using a cleave spec like Reaver or Riftblade anywhere near these mushrooms.
Soothing Mushroom (blue): When damaged grants immunity to Acidic Spores. Boss will Enrage if it dies. Also lets you see blue wave lanes.
Acidic Spores: Raid wipe mechanic. 10s cast. Kills the raid unless under the protection of a Frenetic Mushroom.
Frenetic Mushroom (green): When damaged grants immunity to Caustic Spores. Boss will Enrage if it dies.
Caustic Spores: Raid wipe mechanic. 10s cast. Kills the raid unless under the protection of a Caustic Mushroom.
Smoldering Mushroom (Orange): When damaged grants immunity to Incendiary Spores. Boss will Enrage if it dies. Also lets you see red wave lanes.
Incendiary Spores: Raid wipe mechanic. 10s cast. Kills the raid unless under the protection of a Caustic Mushroom.
Usually the bard or tank licks (hit it one time only) the Mushrooms. Do it once and with the lowest damage possible. After 3-4 Mushrooms he will do Call for Help. It is advised the raid moves towards the safe spot(s) in order to avoid the waves. Read more below.
Add Mechanics
Lifewrought: Heals enemeies around it. Can be CCed. Heals corresponding Mushroom on death.
Sentinel: Hits hard. Can be CCed. Heals corresponding Mushroom on death.
Soothseer: Deals AOE damage around it. Can be CCed. Heals corresponding Mushroom on death.
The adds will spawn everytime after 4 Mushroom phases. You should CC them as much as possible while killing them quickly. A general guideline for kill order could be: keep the Sentinel CCed, kill the Lifewrought, kill the Soothseer, kill the Sentinel. In any case the tank needs to aggro them quickly. (Killing them does NOT enrage Hericius.)
|
This is the Green Mushroom, located on the left side.
|
The Incendiary mushroom spawns BEHIND the boss, here.
|

Easy/Normal/Hard Mode Differences
Increased Damage: All of the damage from each mechanic increases by each tier.
The Unseen Schism (jumping wave): In hard mode there are waves you will need to jump.
Floor Coloration and the "safe spot": There is a small safe spot from the blue and red waves near the center of the room and a brown spot to the left of the entrance. With low render graphics they're less difficult to see. Trion management has advised that the wave patterns will not be changed in future patches. Note that these waves are visible in Easy Mode, but invisible to all but one person in Normal and Hard Modes. You'll either need to have the one person with visibility call these (mark them with a squirrel, or an 8, if you're that guild) and/or utilize one of the two known safe spots if you so choose.
Kill Video
Special thanks to Discordya for the Easy Mode kill video. Most of the mechanics should stay throughout all fights.
Thanks to TheKeepor for the Normal Mode Kill video. Ignore the creepy guy behind him. It's a mannequin.
Also thanks to Filri who provided the Hard Mode Kill video. Hopefully you will be able to see the differences.
Thanks to TheKeepor for the Normal Mode Kill video. Ignore the creepy guy behind him. It's a mannequin.
Also thanks to Filri who provided the Hard Mode Kill video. Hopefully you will be able to see the differences.
Loot Table
RiftScene has most of the gear in their tables.
EZ: T2 Chest and Ring
NM: T3 Chest and Weapon (Off hand?)
HM: T3 Relic Chest and Weapon (Off hand?), and ?????, Tower Sigil
EZ: T2 Chest and Ring
NM: T3 Chest and Weapon (Off hand?)
HM: T3 Relic Chest and Weapon (Off hand?), and ?????, Tower Sigil
|
Easy Mode Loot
Rings (Convertable to Guard) Nascent Ahnket Band - Warrior - AP85 Nascent Lifewrought Ring - Cleric - CP183 Nascent Band of Hericius - Rogue - AP125 Nascent Soothseer Loop - Mage - CP22 Legs (Convertable to Guard) Nascent Flamestrom Leggings - Rogue - AP180 Nascent Ash Flecked Britches - Mage - CP317 Nascent Fyragnos Legplates - Warrior - AP190 Nascent Legguards of Ahnket - Cleric - SP144 |
Normal Mode Loot Two of the following: Chest Empowered Chestguard of Ahnket - STR/AP Empowered Heretic Hunter Mailshirt - WIS/SP Empowered Acid-Splashed Jerkin - DEX/AP Empowered Raiment of Smoldering - INT/SP Weapons Spore Guard - Shield - STR/DODGE Tower Blade - 2H Sword - STR/CP Fungi Crusher - 2H Hammer - WIS/SP Shroom Carver - Dagger - DEX/CP Soothseer Stave - INT/CP Weapons convert to Block. |
Hard Mode:
Normal Mode loot plus one of the below and a Tower Sigil (All bosses but Lord Fionn appear to have this as their HM loot table.) Capes (Sidegrade to Block Hellion's Cape - STR/AP Ducal Cape - WIS/SP Blazing Drapes - AGI/AP Shroud of Eblius - INT/SP Ring (Sidegrades as shown) Ahnket Band - STR/CP (Dodge) Beseiger's Hoop - STR/AP (Guard) Lifewrought Ring - WIS/CP (Dodge) Ring of the Tower Sentinel - WIS/SP (Guard) Band of Hericius - DEX/CP (Dodge) Sporific Loop - DEX/AP (Guard) Soothseer Loop - INT/CP (Dodge) Fungal Band - INT/SP (Guard) Earring (Sidegrades as shown) Inferno Hoop - STR/CP (Block) Ornament of Searing - STR/PC (Block) Whithering Loop - WIS/CP (Block) Fyragnos Bauble - WIS/SCH (Guard) Sigil of Despair - DEX/PC (Guard) Ornament of Ahnket - DEX/CP (Block) Sigil of Lava - INT/SCH (Guard) Flamecast Earring - INT/CP (Block) |
HTML Comment Box is loading comments...
