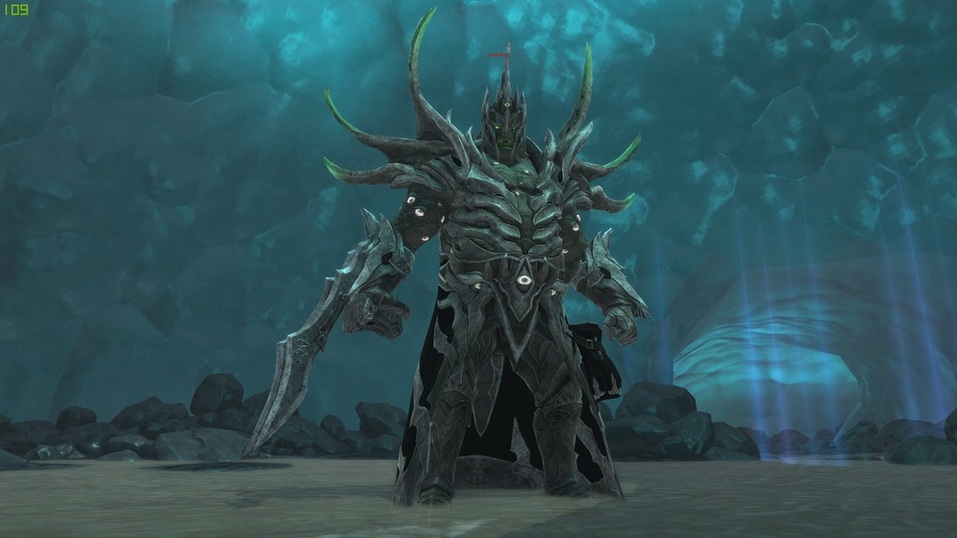
Lord Arak
Boss Information
Health: 344.9 Million (5/12/16)
Enrage Timer: 8.5 Minutes
Difficulty: 8/10 (Due to coordination required)
DPS Requirement: 70K per DPS
Enrage Timer: 8.5 Minutes
Difficulty: 8/10 (Due to coordination required)
DPS Requirement: 70K per DPS
Raid Setup
- 2 Tanks
- 2 raid healers
- 1 ST Healer
- 1 Defiler
- 1 Bard * for stunning
- 1 harbchon
- 12 ST DPS
Phase One: 100%-41%
Boss Mechanics
Mind Blast: Arak will start charging up a Mind Blast (There is a progress bar). You have 25 seconds to use the Bulwark Rotators to turn the safe cone AOE to the other white Safe zone. If you do not, Arak will wipe the raid.
Traumatic Memory: A stacking debuff for each time you use the Bulwark Rotator. Increases the damage taken for clicking the rotator. You can survive up to 6 stacks (Non tanks can survive 1).
Phantom Wounds: Approx. 30K Raid wide Damage. Inflicted every time Arak initiates a cast.
Psychic Horror: Massive Red Area around the boss (Think Zone of Life from Drekanoth). Every tick of damage for standing in this area doubles. 1st tick is 50K.
Terminal Sedation: 3 Second Debuff on the tank. Will one shot the tank if not cleansed.
Fragmented: A tank Swap mechanic. Increases the damage taken. Swap at 3 stacks maximum.
Strike and Pummel: Both Arak’s auto attacks. Pummel applies one stack of the fragmented debuff.
Theta Waves: Caused by interrupting Arak's Pain cast while he has the “Negate Pain” buff. This heals the boss.
Greater Weakness: Caused by interrupting Arak’s Weakness cast when he has the “Negate Weakness” buff. Causes the raid to deal significantly less damage. See the bottom of this section for details.
Vulnerability Phase: Arak will go immune and the nightstalkers will turn white. They can now be killed, but they also need to be tanked (They do 100K dmg, see "Add Mechanics" for more details). The bubbles will turn into crystal and be killed as well. You need to kill the crystals and as many adds as you can. Arak will show an emote "You're Running out of Time, Fools" at which point everyone needs to be in or running back to the white cone safe AOE. It will spawn where the nightmare hand is on the edge of the room (It hangs over the jagged rocks and can be hard to see. The easiest thing to do is stay semi close to the center and be prepared to bolt to the safe area. Arak will take damage at this point again and resume the mind blast phase.
There are 3 special interruptible channels you need to assign players to interrupt. Interrupting and not interrupting is based on buffs on the boss and have their own consequences, so I feel they need some more elaboration. Interrupting these while the buff is NOT active has no effect and needs to be done by selected players. Not interrupting these while he has the “Negate X” buff also has no effect.
The boss will gain a random buff called “Negate X”. X is either petrified, pain, or weakness.
Petrified: 3 second interruptible channel. 9 second cooldown. If interrupted while Arak has the “Negate Petrified” Buff, he will spawn a night stalker (See the “Add Mechanics” Section for details). If it is not interrupted and Arak does NOT have the buff, then he will root a player for 5 seconds.
Pain: 3 Second Interruptible Channel. 9 second cooldown. If interrupted while Arak has the “Negate Pain” Buff, he will cause “Theta Waves” (See mechanics section). If it is not interrupted and Arak does NOT have the buff, he will one shot one random player in the raid.
Weakness: 3 second interruptible channel. 9 second cooldown. If interrupted while Arak has the “Negate Weakness” buff, he will cause “Greater Weakness” (See mechanics section). If it is not interrupted and Arak does NOT have the buff, then he will cause the raid to deal less damage.
Add Mechanics
NightStalker:
10 million HP; Spawn every 30 seconds. If they get close to your raid, they will debilitate everyone for 2 seconds. They will continue to do this frequently. In order to prevent this, using a single target stun on them will stun them for 20 seconds. You may also knock them back. They are immune to all damage during the mindblast phase.
During the vulnerability phase, they can and need to be killed. They do not debilitate anyone during this phase, but they do need to be aggroed by the tank as they do 100K damage.
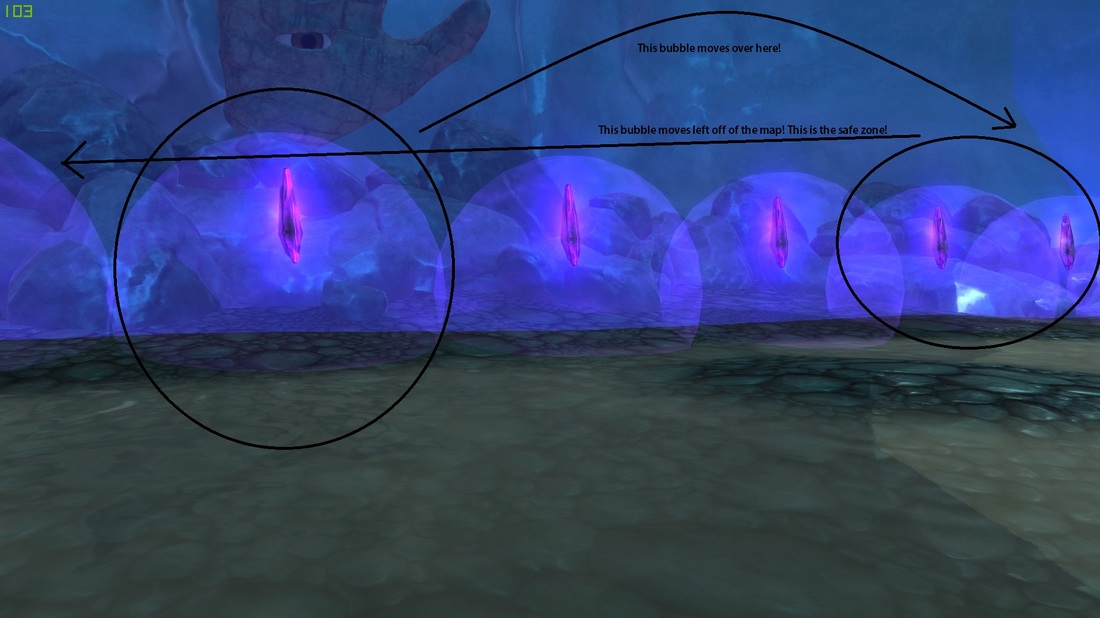
Bubbles:
Bubbles spawn every 8 seconds during phase 1. They are immune during the mind blast phase. They are blue, green, and red. Each one has a different and harmful effect.
More Details on Bubbles:
The Green Bubble (Fright): Fears players for 5 seconds, but stunning a nightstalker in the green bubble reduces his max HP by 50%.
The Blue Bubble (Repulsion): Knocks players back, but stunning a nightstalker in the blue bubble keeps him trapped until the vulnerability phase.
The Red Bubble (Anguish): Damages players for 85K, but stunning a nightstalker in the red bubble reduces his max HP by 50%.
10 million HP; Spawn every 30 seconds. If they get close to your raid, they will debilitate everyone for 2 seconds. They will continue to do this frequently. In order to prevent this, using a single target stun on them will stun them for 20 seconds. You may also knock them back. They are immune to all damage during the mindblast phase.
During the vulnerability phase, they can and need to be killed. They do not debilitate anyone during this phase, but they do need to be aggroed by the tank as they do 100K damage.
Bubbles:
Bubbles spawn every 8 seconds during phase 1. They are immune during the mind blast phase. They are blue, green, and red. Each one has a different and harmful effect.
More Details on Bubbles:
The Green Bubble (Fright): Fears players for 5 seconds, but stunning a nightstalker in the green bubble reduces his max HP by 50%.
The Blue Bubble (Repulsion): Knocks players back, but stunning a nightstalker in the blue bubble keeps him trapped until the vulnerability phase.
The Red Bubble (Anguish): Damages players for 85K, but stunning a nightstalker in the red bubble reduces his max HP by 50%.
Phase 2: 40%-21%
Add Mechanics
Pain, Weakness, and Petrified are also present in phase 2.
Despair: This is the two lines of purple bubbles that spawn on two sides of the room, forming half a box. One of the two lines will shuffle (similar to moving LED bubbles lighting up back and forth) and two gaps will appear (one melee near Arak, and one ranged). The shuffling row will stop shuffling and move from one side of the room to the other. If you don't get in one of the two gaps (preferably the melee one near Arak) you get Derangement.
Derangement: Damage caused by not avoiding the purple bubbles moving across the room. The damage is fatal.
Divide and Conquer: 3.5 second cast from Lord Arak. the room will split into 3 white cones and 3 red cones. There are 4 patterns and each time one of them will happen. Standing in a red cone is a one shot, but standing in a white cone will radiate 10K damage per person standing in that same white cone.You need 2 groups with 7 people and one with 6.
Nightmare Guardians: 3 million HP. There are five of them around the boss. See Fantasmic defense for why you need to kill them.
Fantasmic Defense: Stackable buff on Lord Arak for each Nightmare Guardian still alive. Radiates AOE damage to the raid and reduces his damage taken by 20% (PER STACK). DPS them down BEFORE killing the boss.
Boss Mechanics
Despair and Divide & Conquer will activate three times each. Three purple bubble waves, then three sets of pizza slices. It then repeats until somebody dies; your raid or Arak:
2x Dodge Rows
3x Divide and Conquer
2x Dodge Rows
3x Divide and Conquer
Etc.
Divide & Conquer Tips: Assign three groups (7, 7 and 6 for 20 total) to a marker. Something like 1=Tank group, 2=Squirrel group and 3=Sword group. Have the marked people spread out between phases in a triangle around Arak. Everybody moves clockwise for each new Divide & Conquer. This way you don't end up with 14 people on one slice, causing 140K damage to everyone.
2x Dodge Rows
3x Divide and Conquer
2x Dodge Rows
3x Divide and Conquer
Etc.
Divide & Conquer Tips: Assign three groups (7, 7 and 6 for 20 total) to a marker. Something like 1=Tank group, 2=Squirrel group and 3=Sword group. Have the marked people spread out between phases in a triangle around Arak. Everybody moves clockwise for each new Divide & Conquer. This way you don't end up with 14 people on one slice, causing 140K damage to everyone.
Phase 2.5: 20%-0%
Everything that happens in phase 2 happens in phase 2.5.
The Green, Blue and Purple bubbles from phase 1 will start spawning again with no method of despawning. Save your CD's for 20% so you can burn Arak down quickly. This acts as a soft enrage.
The Green, Blue and Purple bubbles from phase 1 will start spawning again with no method of despawning. Save your CD's for 20% so you can burn Arak down quickly. This acts as a soft enrage.
Pagura (1/9) Fauxmire (3/9)
Useful Kalerts
Have the boss on FOCUS TARGET (Target him and press Shift + F) for the negate buffs and interrupts to work.
Fragmented Swap(Tank) USE THIS WITH THE ONE BELOW
----------------------------------------
KA:MoM-Arak-Fragmented:aHHpDeNotjVELwiAAhP+R6caSuKeoDXqJWIteBHHThrA01B7279MR
dxzc93AHhgGfRa0mkKTCbBIK6YqCmt/GJaPhvDOgqDdOs3r7SjirpHbicRFqtItNq7STd1HkmL4x
Wu8kZXIkWkccKo6Gc/CqmJEmb9yfxxtO7XVo+/yZXYY53d7/uC5tnztD9wNmTjOZ
Fragmented Self (Tank)
---------------------------------------
KA:MoM-Arak-FragmentedSelf:aT656eNotjUELwjAMhf+Rtk6mkKNu4MXD2G6FkrVVilsrS3cY
4n83LfIeIfkC74GEHt4Tbm6BvLZZCz5nF5KzEGJwIPiTuWB1/pHgign3argpHP3k06a9iYEUD7MS
+Ri0kHrcWUtwqiTU8gDHc7ZkfSihedEXLs29bzom7BxdidL/x+WqS2v7A0dAMrY
ADD Nightmare Shell | USE THIS WITH THE ONE BELOW
-----------------------------------
KA:MoM-Arak-StunNightmare Shell:aFuYPeNo1TssKwyAQ/JV+Qap9mMIe2wR68ZCYW0BM1GQ
hVajm0L/vWigzh3nA7AIHBT7Oe4KiWoLEZc0v83aHfkW3WQgxOGDUl5YROvQZHiab4zg8RzPhhvm
jcY4hjRa935PTjOupsjaBqAXcmID6VMirKw31apBwb6RqOnLEsn5m9ID6x5fixO9g+wX1JjFJ
ADD Susceptibility | USE THIS WITH THE ONE ABOVE
KA:MoM-Arak-StunSusceptibility:ajoLgeNo1TssKwjAQ/KOaVk2FPWoLXjzUeAuENGnKgiQl
j4N/76YiM4fZmWVnoQMBLpiSoCU1Ep4lmWXLOOMb8wd88AswSmvGCBO6DDed9UG+7lL/1hSa4JPc
SkSHS1QJV6+CU1ZH9KuaG2sT8J7DhXHou8q2OdNVuA4PMUxVsb3myOgP8bdPdeJ78/gFSBg1nA
Divide and Conquer Warning
----------------------------------------------
KA:MoM-Arak-Divide and Conquer:aFn97eNqzNrQOsU7LTy4ttjYBstyA0CWzLDMlVSExL0XB
OT+vsDS1yNrawBosZQCE2Y45qUUl1pm5iempxTGOpUWJuoZ6KSnF1haWptYmFhbWhkZQDFTs4hnm
6eJq7ezqF+IaBBQBIhA0NQDbBRU2BvHMwMa7AQA+OSi8
Pain-1 | USE THIS WITH THE ONE BELOW
------------
KA:MoM-Arak-Pain:azLX/eNqzNrQOsU7LTy4ttjYBstyAMCAxM8/a2sAazDEAwmzHnNSiEuvM3M
T01OIYx9KiRF0jQ72UlGJrSwMDaxNDQ2tDIwsIBkJrZ1e/ENcgEMsQrN3YFGwwVNjYAMgzA5vsBg
DQ2CID
Pain-2 | USE THIS WITH THE ONE ABOVE
-----------
KA:MoM-Arak-Pain Negate:aHtJyeNqzNrIOsU7LTy4ttjYEstyA0C81PbEkVSEgMTPPOi8/L9X
aACgFkjAAwmzHnNSiEuvM3MT01OIYx9KiRF0TQ72UlGJrSwMDaxNDI2tDIwsIBkJrZ1e/ENcgEMs
QrN3YFGwJVNjYAMgzA5vsBgD7CCZZ
Petrified-1 | USE THIS WITH THE ONE BELOW
KA:MoM-Arak-Petrified:apbkDeNotTsEKwyAU+6NN265Qctxa2GWM0t0EsdVuUqlQn4f9/VRGc
khCIAHHhNUvMaBJakh4Gjrsao0GGErCEka7Em6K1Fm87kLN1ln6Srv4PYhUp0DKbeaQ5OP7Y3ajZ
fDRScblfNI6oOMMTcXQtZkVOHDtH1M/ZpUHOOpLefCPa5ZcW9aHH6xvMzw
Petrified-2 | USE THIS WITH THE ONE ABOVE
------------------
KA:MoM-Arak-Petrified Negate:at6hSeNqzNrIOsU7LTy4ttjYEstyA0C81PbEkVSEgtaQoMy
0zNcU6Lz8v1doAKA+SNQDCbMec1KIS68zcxPTU4hjH0qJEXRNDvZSUYmsLS1NrEwNTa0MjCwgGQm
tnV78Q1yAQywBsjLEp2CaosLEBkGcGNtkNABNeKHw
Weakness-1 | USE THIS WITH THE ONE BELOW
---------------------
KA:MoM-Arak-Weakness:adJlJeNotjUELwjAUg/+Rvm51UHLUDbx4GBMvBalbK4/pKr568N/bFU
kIX3IJFAaEOH4EOlOXdfFuXrwIQCgDZfUcEg4uua09H6278YPT98pjXMTKi9+cYnjG5R6j+GozTQ
KjNDQZmGZ1BQXs29PQ9itRDkK9K5f/uabcmvLX/QBJOC2F
Weakness-2 | USE THIS WITH THE ONE BELOW
---------------------
KA:MoM-Arak-Weakness Negate:asoUReNqzNrIOsU7LTy4ttjYEstyA0C81PbEkVSE8NTE7L7W
42DovPy/V2gAoDZI0AMJsx5zUohLrzNzE9NTiGMfSokRdE0O9lJRia0sDQ2tjSwtrQyMoBkJrZ1e
/ENcgEAtkiIG1sSnYIqiwsQGQZwY22Q0A4RUoIA
Loot Table
The loot table is complete, but is pending beautification. Please forgive our mess.
Note: All Nexian, Enigmatic, Ruin Forged and Nightmare Steel gear is convertible to Fortified (tank).
3 Drops
1 Ring
1 Shoulder
1 On-Use Trinket
Ring
Nightmare Steel Band - Warrior DPS - PC270
Ruin Forged Band - Cleric DPS - SC - 270
Enigmatic Signet - Rogue DPS - PC270
Nexian Ring - Mage DPS - SC270
Shoulders
Nightmare Steel Shoulderguards - Warrior DPS - AP144
Ruin Forged Chain Spaulders - Cleric DPS - SP144
Enigmatic Leather Pauldrons - Rogue DPS - AP144
Nexian Silk Mantle - Mage DPS - SP144
On Use Trinkets
Enigma Seal of Might - Warrior DPS - CP231
Enigma Seal of Insight - Cleric DPS - CP231
Enigma Seal of Swiftness - Rogue DPS - CP231
Enigma Seal of Intellect - Mage DPS - CP231
Genesis Seal of Might - Warrior ST Heal - CP231
Genesis Seal of Insight - Cleric ST Heal - CP231
Genesis Seal of Swiftness - Rogue ST Heal - CP231
Genesis Seal of Intellect - Mage ST Heal - CP231
Ruin Seal of Might - Warrior AoE Heal - CP231
Ruin Seal of Insight - Cleric AoE Heal - CP231
Ruin Seal of Swiftness - Rogue AoE Heal - CP231
Ruin Seal of Intellect - Mage AoE Heal - CP231
Nightmare Seal of Arcane Warding - Warrior Tank - GD141
Nightmare Seal of Forsight - Cleric Tank - GD141
Nightmare Seal of Evasion - Rogue Tank - GD141
Nightmare Seal of Fortitude - Warrior Tank - GD141
Thanks to Oria Xu and the Apotheosys guild for the original guide. I condensed it and tried to update for patches.
HTML Comment Box is loading comments...
