Uruluuk
Boss Information
Health 178M / (HM) 222.5M (5/4/16)
Enrage Timer: 10 Minutes
Difficulty: 5/10
DPS Requirement: 297K / (HM) 370.8K Raid DPS
Enrage Timer: 10 Minutes
Difficulty: 5/10
DPS Requirement: 297K / (HM) 370.8K Raid DPS
Raid Setup
- 1 Tank
- 1 Tank Healer
- 1 Raid Healer
- 1 Bard or Oracle
- 1 Archon
- 5 DPS
Phase One: 100%-20%
The boss will teleport around 10 seconds into the fight and every minute after that.
Boss Mechanics
Slivers of Earth: Auto Attack (no cleave).
Explosive Crystal: Cast on a random player. Deals AOE damage around them.
Storm of Force: 7 second channel. The raid needs to stack on the boss to not be killed.
Fist of Laethys: Interrupt this! It will one shot people.
Crystal Imprisonment: Cast on a random player. Entraps them inside of a crystal where they cannot move. This is a 3 second cast, and the player needs to run at least 7 meters away from the boss before they are crystallized. Failure to move away heals the boss for a LARGE amount.
Crashing Boulders: 2.2 second cast. This needs to be interrupted or it deals unhealable (mostly) raid damage.
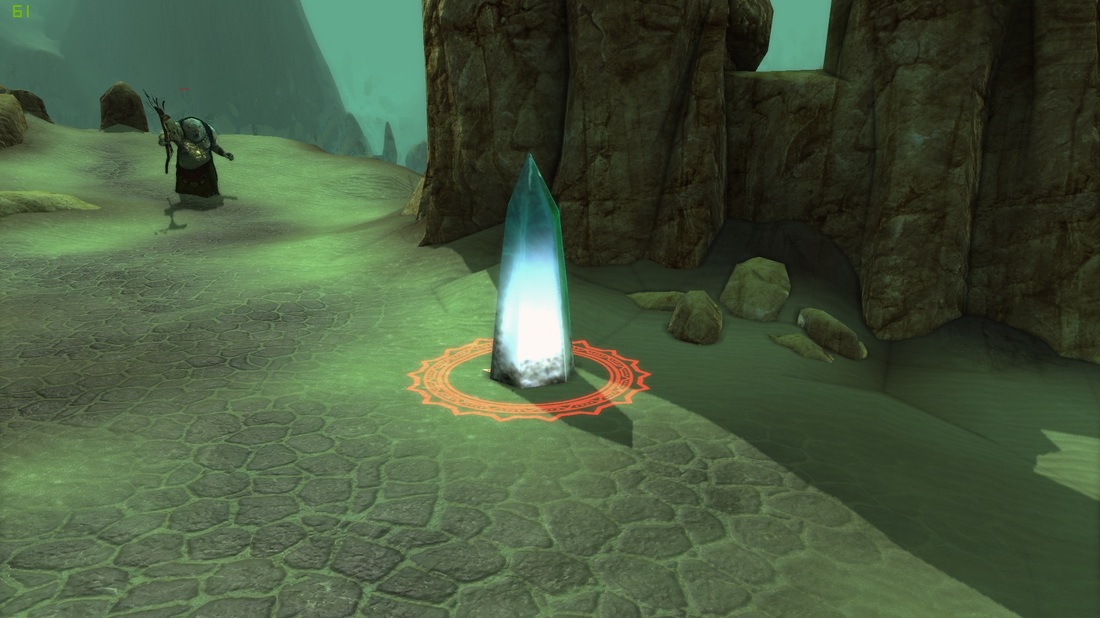
Crystalline Impact: Cast on a random player. Spawns a green crystal where they are standing after 5 seconds.
Curse of Insignificance: Cleanse mechanic. Target deals 50% less damage.
The Crystal Phase:
Rage of Laethys: After every second teleport, the boss will teleport out of range and cast Crystalline Impact. He will then channel Rage of Laethys (different from Fist of Laethys). This is a 16 second cast that deals massive AOE damage to the whole raid. The green crystal protects you from the damage. However, you need to heal the crystal to keep it alive. If it dies, you will probably wipe. Adds will also spawn during this phase. These can be ignored or tanked and killed depending on raid DPS. Once the cast is finished, the boss will teleport back to the middle of the room.
Earthen Exhasution: Debuff on the boss that increases his damage taken for 20 seconds (Happens after he teleports back to the center). This begins the crystal phase. (See below for info)
Three crystals will spawn at the back of the room. Facing the boss from left to right, they are:
Shrine of Gold: Increases damage done and damage taken by 1%
Shrine of Rage: Increases Damage done by 5%
Shrine of Protection: Decreases damage taken by 5%
A player standing in the yellow aoe around the crystal will get a stacking buff called “Crystal Attunement, which increases their damage done by 5%. This stacks 10 times. Those stacks also apply to the boss.
For each shrine up he will gain a corresponding damage increase every 5 seconds. This needs to be purged.
Explosive Crystal: Cast on a random player. Deals AOE damage around them.
Storm of Force: 7 second channel. The raid needs to stack on the boss to not be killed.
Fist of Laethys: Interrupt this! It will one shot people.
Crystal Imprisonment: Cast on a random player. Entraps them inside of a crystal where they cannot move. This is a 3 second cast, and the player needs to run at least 7 meters away from the boss before they are crystallized. Failure to move away heals the boss for a LARGE amount.
Crashing Boulders: 2.2 second cast. This needs to be interrupted or it deals unhealable (mostly) raid damage.
Crystalline Impact: Cast on a random player. Spawns a green crystal where they are standing after 5 seconds.
Curse of Insignificance: Cleanse mechanic. Target deals 50% less damage.
The Crystal Phase:
Rage of Laethys: After every second teleport, the boss will teleport out of range and cast Crystalline Impact. He will then channel Rage of Laethys (different from Fist of Laethys). This is a 16 second cast that deals massive AOE damage to the whole raid. The green crystal protects you from the damage. However, you need to heal the crystal to keep it alive. If it dies, you will probably wipe. Adds will also spawn during this phase. These can be ignored or tanked and killed depending on raid DPS. Once the cast is finished, the boss will teleport back to the middle of the room.
Earthen Exhasution: Debuff on the boss that increases his damage taken for 20 seconds (Happens after he teleports back to the center). This begins the crystal phase. (See below for info)
Three crystals will spawn at the back of the room. Facing the boss from left to right, they are:
Shrine of Gold: Increases damage done and damage taken by 1%
Shrine of Rage: Increases Damage done by 5%
Shrine of Protection: Decreases damage taken by 5%
A player standing in the yellow aoe around the crystal will get a stacking buff called “Crystal Attunement, which increases their damage done by 5%. This stacks 10 times. Those stacks also apply to the boss.
For each shrine up he will gain a corresponding damage increase every 5 seconds. This needs to be purged.
Phase Two: 20%-0%
Boss Mechanics
All the previously mentioned mechanics are present.
The boss will teleport back to his starting point, rooted.
He will get a buff called “Power of Greed” that increases his damage done and reduces his damage taken by 15%.
From now on every 20s an add will spawn. These need to be at least 7m away from him or they will heal him. Regularly an add will grow and get a buff increasing its damage. Purge.
Strategy
Assign 2 purges. Coordinate the interrupts. The tank should always do Crashing Boulder (plus a backup).
Engage and wait for him to teleport the first time, follow and then use raid cooldowns. Stack up for Storm of Force. Run away with Crystal Imprisonment (preferably to the middle). Free your fellow raiders from this and when the Rage of Laethys phase is about to commence stack up in the middle.
Pull him to each shrine to increase cleave damage. Kill the shrines while maintaining purges and interrupts.
When he teleports to his starting position be sure to interrupt him. Maintain purge on him(if you've left any shrines up) and purge the adds.
Hard Mode
Boss Mechanics
Crystal Desecration: Spawned crystal every 5% HP loss from the boss. It deals 15K AOE damage to the raid. Displacable (pull, knock back)
Be sure to pull the Crystals to the boss and cleave them down. They should die quickly.
Be sure to pull the Crystals to the boss and cleave them down. They should die quickly.
Thalguur (3/4) Tier 3 Raiding
Useful Kalerts
Crystal Attunement
--------------------------------
KA:GP-Uruluuk-Crystal Attunement:aUQIueNotTcEKwjAU+xW/QDudA3knnRt40MGot8Goa4
Vi+yrt8zDEf/dVJDmEJCRQgISnU7OJkGXLqOOcSLnFnuiFxhskwIAGBDdyLhi9vRMcFanVcD0Nlo
wf7RQwDbdonbMKadRW+YB6qXWCstjAthSwqzLXPPTmi+mRPlA3F9n07DDzMrck49BJ2Z3/IXstVL
9r+QV8nzfB
Crashing Boulders (interupt)
----------------------------------------------
KA:GP-Uruluuk-Crashing Boulders:a+lKMeNqzNrQOsU7LTy4ttjYBstyA0LkosTgjMy9dwSm
/NCcltajY2trAGixjAITZjjmpRSXWmbmJ6anFMY6lRYm6JoZ6KSnF1oYGpgbWZuYG1oaWRhCsZ2p
toGdube3s6hfiGmRtaA1EIDOMDcBWQYXBPDOw8SEAC6QoEg
Fist of Laethys (Interupt)
----------------------------------------
KA:GP-Uruluuk-Fist of Laethys:a7F7yeNqzNrQOsU7LTy4ttjYBstxAMLO4RCE/TcEnMbUko
7LY2trA2hAsYQCE2Y45qUUl1pm5iempxTGOpUWJuiaGeikpxdaGBqYG1mbmQMWWRhCsZ2ptoGdub
e3s6hfiGgQ0BIhA0NgAbBNUGMwzAxsfAgCh3yc7
Loot Table
The loot table is complete, but is pending beautification. Please forgive our mess.
Cloaks
Cloak of Lost Whispers (Block)
Warbringer's Mantle (Block)
Etched Steelweave Cape (Block)
Shroud of Sanctuary (Block)
Volturnus' Luminous Weave (CP)
Shadowspeaker's Manteau (CP)
Vengeance Wrap (CP)
Shroud of Broken Foes (CP)
Weapons
Sanity Blade (1H Dagger)
Broadsword of Ruin (1H Sword)
Staff of Broken Reason (2H Staff)
Brilliant War Mace (2H Mace)
Ancient Recovered Greatspear (2H Polearm)
Recovered Longspear (2H Polearm)
Enduring Broadsword (1H Sword)
Tidal Mace (1H Mace)
Staff of the Winds (2H Staff)
See Anrak the Foul for IGP Hard Mode Loot Table.
HTML Comment Box is loading comments...
