Soulrender Zilas
Boss Information
Health: 395.6 M (5/4/16)
Enrage Timer: getting swarmed
Difficulty: 8/10 (lots of extra duties)
DPS Requirement: 1-1.3 M
Enrage Timer: getting swarmed
Difficulty: 8/10 (lots of extra duties)
DPS Requirement: 1-1.3 M
Raid Setup
- 1 Tank (consider 2 for progression)
- 2 ST Healer (Purifier + Physician/Frostkeeper/Warchanter pairs well)
- 1-2 Raid Healers (recommended for progression)
- 1 Bard or Oracle
- 1 Harbchon/Archon
- 1 Defiler
- 12-13 DPS
Single Phase Fight
Boss Mechanics (100%-0%)
Soulrender Zilas will remain stationary in the middle of the platform.
Soulrender's Rage: Deals damage every second when Zilas' target (tank) is not in melee range. Usually kills the raid. Does not trigger during Soulrender's Grasp.
Gruesome Shlash: Debuff. Increases damage taken.
Deadly Cleave: Cleave.
Soul Shackle: Cleanse mechanic. Stuns for 5 seconds. Starts at 50%.
Soulrender's Grasp: Death beam mechanic. He will rotate around clockwise two and half times. For the first rotation (360°) a white dot (whisp) will circle around the outer perimeter of the platform. For the remaining rotation it will turn into a purple beam and his melee range will be inaccessible due to AOE. Touching the beam, running into or being in melee range and not being on the platform during the entire duration will result in death.
ALL special roles (interrupt, stunning) MUST be performed during this mechanic.
Demonic Presence: Reduces outgoing damage by 10% for each Escaped Butcher active.
Since Zilas himself does very little the real challenge of this fight is defeating the add waves and dealing with their mechanics.
Add Mechanics
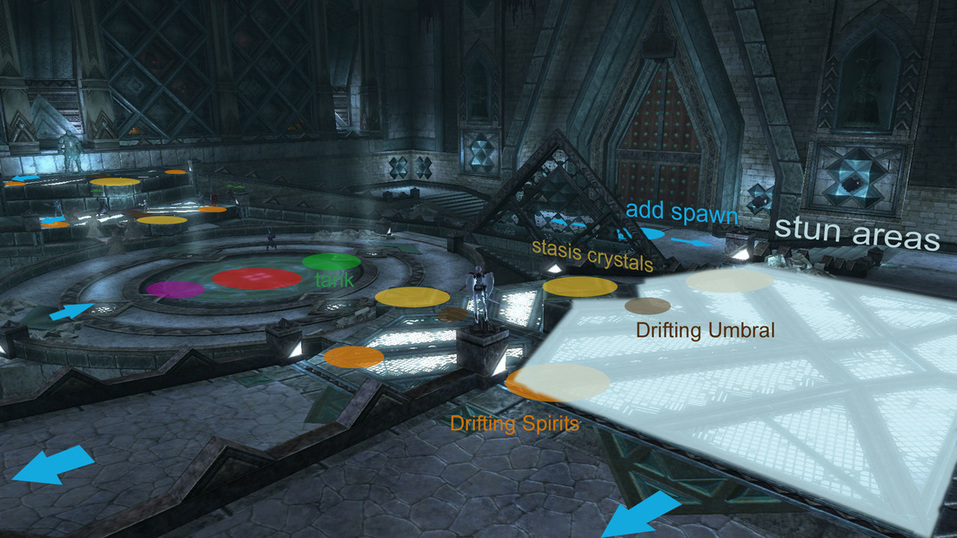
The adds will spawn at the entrance and run around the room over the bridge onto the platform or to dedicated points (Drifting Spirit/Umbral, see picture at the bottom of the page).
Drifting Spirit: White ghost. Stationary. Casts Dark Bolt (auto-attack) and Dark Volley (raid damage). Needs interrupt on Dark Volley. Kill quickly.
Drifting Umbral: Black ghost. Stationary. Spawns from 30%-0%. Disables nearby Stasis Crystals. Kill really quickly.
Escaped Butcher: Huge skeleton. Small cleave (Demonic Cleave). Reduces outgoing damage by 10% per Butcher (Demonic Presence). Never have more than 1-2 of these around.
Wrathful Bones: Small skeleton. 4-5 spawn after every Soulrender's Grasp. Can be lethal if Gruesome Slash is up.
Wrathful Flesh: Small skeleton. 2 spawn after every Grasp but not until 30%. Can be lethal if Gruesome Slash is up. Need interrupt.
Stasis Crystal: Stationary. Stuns nearby (grated area, "stun pad" ) enemies if damaged. 10s cooldown. Glows red (Ignition Crystal) if ready and yellow if activated. Stunned enemies take 10% additional damage. Used to stun the Escaped Magus. It is worth noting that stunning the Escaped Butchers (second priority) is helpful for progression. Does not trigger on certain abilities.
Escaped Magus: Mage add. Begins spawning at 80%. Upon reaching the platform begins casting Purge the Living (10s cast, raid wipe).
Escaped Imp: Imp add. Heals the boss unless interrupted (Cede Spirit). Only casts when on the platform.
To tackle all these adds and their abilities you need to assign special roles. These people should always perform their special role above and during other mechanics. Some of these can overlap.
- 2 interrupts for Escaped Imps (Cede Spirit)
- 1 for stunning the Magus
- 2-4 ranged for Drifting Spirit (interrupt: Dark Volley) and Drifting Umbral (sub 30%)
- 2 interrupts for Wrathful Flesh (sub 30%)
- 1-2 AOE for cleaving adds in the middle (e.g. Stormcaller, Champion,...)
- optional:
- 1 calling out the Magi
- 1 for stunning Butchers
- 1 marking Butchers and Imps for easy targeting
- 1 marked person for the beam phase to stack up on.
Putting it together
I'm special!
Assign all of the special snowflakes.
Order of priority: special role > (Drifting Umbral) > Escaped Magus > Escaped Butcher > (Escaped Imp) > Zilas.
() depends on how you assigned the special roles.
Here is a rundown by percentage.
Face Zilas away from the raid towards the stairs leading down. It makes it easier to see adds spawning. The raid stacks up behind Zilas. The Escaped Imps plus Escaped Butchers will start spawning soon and at 90% the Drifting Spirits will start spawning.
If at any time you get more than 1 Butcher DPS them down immedeatly or just focus them from the start. The latter is recommended unless you have great cleave. Notice how Zilas is of the least priority. If you so choose have them stunned as well.
At 80% the first Magus will (/is likely to) spawn. Have him called out, stunned and DPS him down. You can get two stuns off on one pad if timed well. If he is low on health leaving the pad rejoin the raid, let him come around the corner and kill him on the bridge. You will need to do this with every Magus and even during the beam (stunning only). Try to debuff (archon/bard) the Magus.
At 70% the first beam phase is about to commence.
ALL special roles (interrupt, stunning) MUST be performed during this mechanic. You need to be on the platform. After Soulrender's Grasp multiple Wrathful Bones will spawn running up the stairs. Pick them up and position in a manner that allows to AOE them. Coordinate cooldown usage.
At 50% he will start using Soul Shackle.
At 30% Drifting Umbrals will start spawning disabling the stun pads while they are alive. Kill quickly. Wrathful Fleshs will now start spawning with Grasp. Interrupt them.
A general note:
It is very hard to recover from a failed add mechanic, for example stunning the Magus. Even if you get him barely down when he reaches the platform the next one is about to spawn, putting you further and further behind every time. Eventually you'll get swarmed.
Where everything is
Loot Table
(The loot table is complete, but is pending beautification. Please forgive our mess.
2-3 Drops
Gloves
Gauntlets of Unholy Rituals - Warrior Tank - CP236
Honorbound Gauntlets - Warrior Tank - BL286
Rune-Priest's Gauntlets - Cleric DPS - SP115
Fallen Hero's Handguards - Cleric Tank - BL295
Grips of the Runemender - Rogue DPS - CP203
Handguards of the Dead - Rogue Tank - BL264
Gloves of the Broken - Mage DPS - CP188
Gloves of Refuge - Mage Tank - BL252
Ranged (Shared with Grugonim)
Rifle of the Lost Prince - Warrior DPS - AP170
Corrupted Runeguard Cannon - Warrior Tank - GD191
Cracked Dwarven Femur - Cleric DPS - SP170
Elusive Slipstream - Cleric Tank - GD180
Striker's Ally - Rogue DPS - AP169
Sawed-Off Boomer - Rogue Tank - GD189
Baton of Shades - Mage DPS - SP170
Impure Shaper's Truncheon - Mage Tank - GD189
HTML Comment Box is loading comments...
