Inwar Darktide
Boss Information
Health: ?
Difficulty: 7/10
Enrage: >5 stacks of Dark Tide (soft, around 5 minutes for final phase)
DPS Requirement: 900k-1 Million for final phase
Difficulty: 7/10
Enrage: >5 stacks of Dark Tide (soft, around 5 minutes for final phase)
DPS Requirement: 900k-1 Million for final phase
Raid Setup
- 2 Tanks
- 1 ST Healer
- 2-3 Raid Healer
- 1 Defiler
- 1 Bard
- 1 Archon
- 11-12 DPS
Split equally into 2 groups of equal strength with one group favoring melee specs (with cleave) and the other ranged specs.
Phase One: Aqualix and Denizar
Boss Mechanics
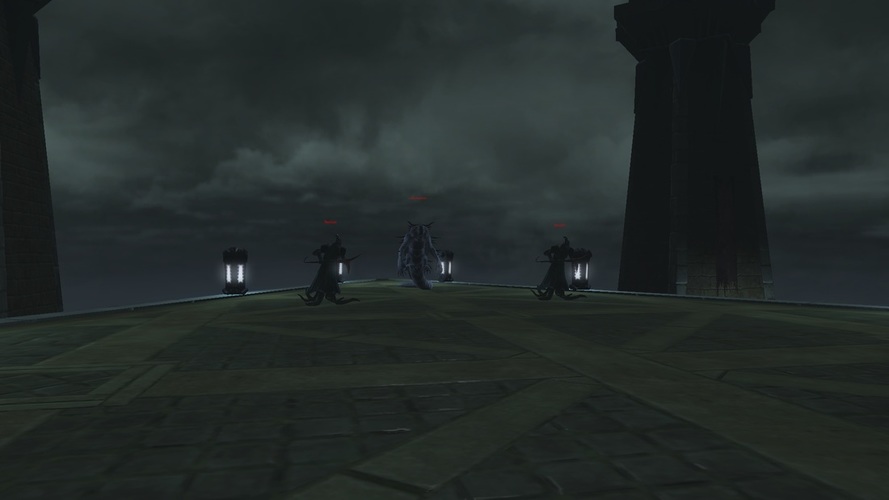
The first event during this encounter is the fight against Aqualix and Denizar. They need to die at or close to the same time.
Aqualix
Rolling Thunder: Deals damage to everything outside the safe zone (blue circle). Stack up in melee.
Storm Armor: Increases spell damge.
Denizar
Freezing Wave: Deals damage around him.
Stormtouched Armor: Increased Resistance against physical attacks.
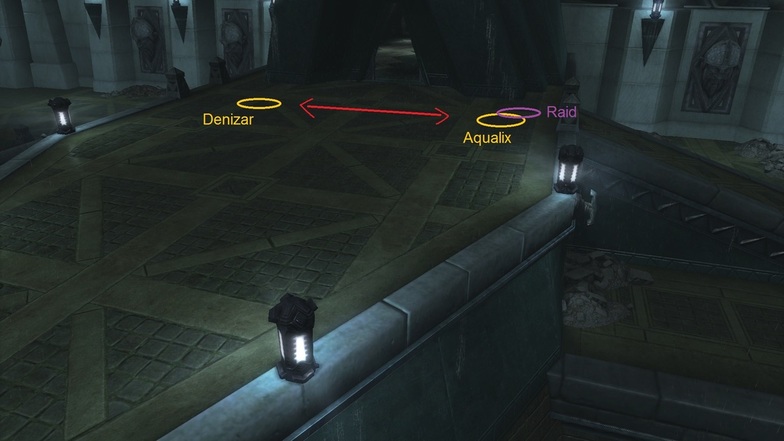
Strategy
Have the raid stack up near the left staircase and pull Aqualix there. The second tank picks up Denizar and places him at least 20m away from the raid. Once Denizar casts his Freezing Wave the second tank can join the group. Before Denizar casts the next Freezing Wave he must be moved out again (around 50 seconds later). Repeat until they both die. Damage them equally.
Once they are dead blue circles will appear all over the area but in fixed positions. It's helpful to remember the general location of these because they will spawn regularly until the final phase. These need to be dodged. They inflict damage and knock you uncontrollably and sometimes throwing you off the edge of the encounter resulting in death. If you fall down you can't be rezzed until the end of the fight.
Aqualix
Rolling Thunder: Deals damage to everything outside the safe zone (blue circle). Stack up in melee.
Storm Armor: Increases spell damge.
Denizar
Freezing Wave: Deals damage around him.
Stormtouched Armor: Increased Resistance against physical attacks.
Strategy
Have the raid stack up near the left staircase and pull Aqualix there. The second tank picks up Denizar and places him at least 20m away from the raid. Once Denizar casts his Freezing Wave the second tank can join the group. Before Denizar casts the next Freezing Wave he must be moved out again (around 50 seconds later). Repeat until they both die. Damage them equally.
Once they are dead blue circles will appear all over the area but in fixed positions. It's helpful to remember the general location of these because they will spawn regularly until the final phase. These need to be dodged. They inflict damage and knock you uncontrollably and sometimes throwing you off the edge of the encounter resulting in death. If you fall down you can't be rezzed until the end of the fight.
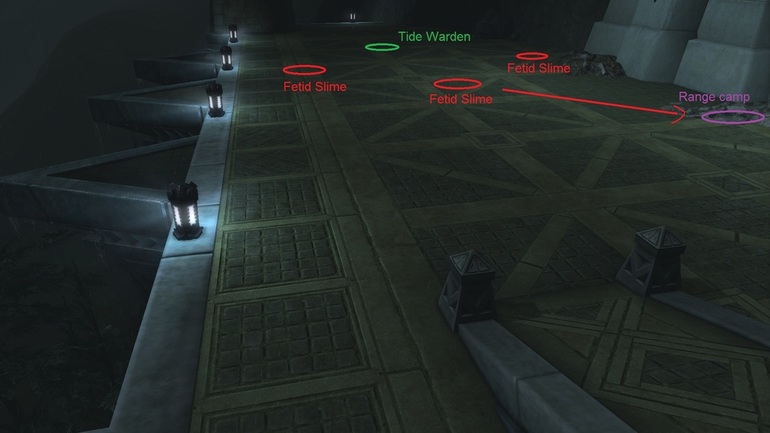
Phase Two: Tide Wardens
The raid will split up into the previous assigned groups with the ranged camp going down the right side stairs hugging the wall and the melee camp going down the left side stairs stacking up on the first ledge extending outward near the edge.
There will be spawning adds on each side along with a Tide Warden which will become active once the adds are dead. Defeating the Tide Wardens will advance this phase. They need to die within 10 seconds of each other.
Right side(ranged camp)
Fetid Slime: Spawns Smaller Fetid Slimes. They cast Bile Wave at 10% health. Kills most players. Outrange or kill quickly. Pull one at a time.
Once defeated stack on the Tide Warden and kill it simultaneously with the other sides Tide Warden. Needs to be interrupted otherwise stuns random people. Beware blue circles while moving.
Once defeated will spawn Undertow (giant white blob). Cleaves and knocks back while under the influence of Surge. CastsFlash Freeze on random people, freezing them, damaging and knocking back anyone inside its AOE. Spread to avoid this mechanic.
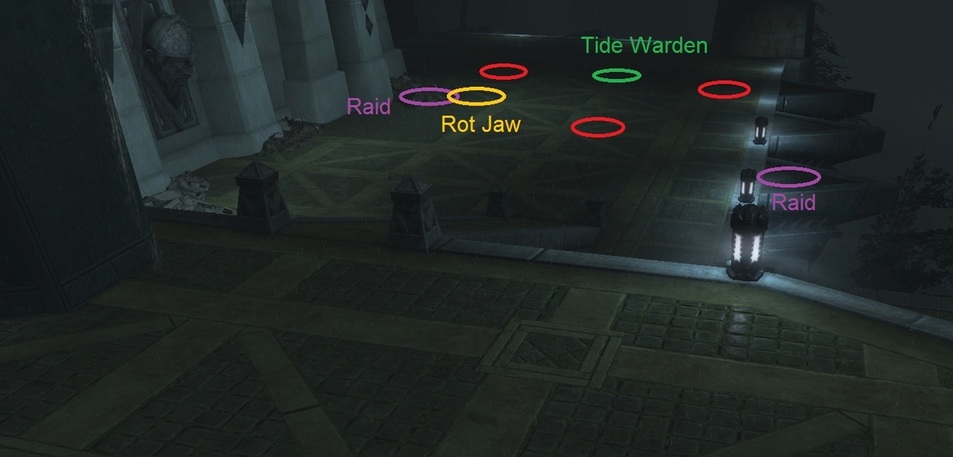
Left side(melee camp)
Scuttle Claw: Spawns Scuttle Claw Wranglers. They stun and occasionally knockback. Kill quickly. Pull one at a time.
Once defeated stack on the Tide Warden and kill it simultaneously with the other side's Tide Warden. Needs to be interrupted otherwise stuns random people. Beware blue circles while moving.
Will spawn Rot Jaw. Casts Bilge Slime, AOE around him. Can be healed easily. Spawns Mana Ravagers. After a while these will begin casting Mana Infusion. Drains mana and heals Rot Jaw. They need to be cleaved immedeately.
Undertow and Rot Jaw don't need to die at the same time but once they are both dead Inwar Darktide will spawn and attack. One group's tank should be ready to pick him up while the other side is finishing. Once you are done on your side you can assist the other.
There will be spawning adds on each side along with a Tide Warden which will become active once the adds are dead. Defeating the Tide Wardens will advance this phase. They need to die within 10 seconds of each other.
Right side(ranged camp)
Fetid Slime: Spawns Smaller Fetid Slimes. They cast Bile Wave at 10% health. Kills most players. Outrange or kill quickly. Pull one at a time.
Once defeated stack on the Tide Warden and kill it simultaneously with the other sides Tide Warden. Needs to be interrupted otherwise stuns random people. Beware blue circles while moving.
Once defeated will spawn Undertow (giant white blob). Cleaves and knocks back while under the influence of Surge. CastsFlash Freeze on random people, freezing them, damaging and knocking back anyone inside its AOE. Spread to avoid this mechanic.
Left side(melee camp)
Scuttle Claw: Spawns Scuttle Claw Wranglers. They stun and occasionally knockback. Kill quickly. Pull one at a time.
Once defeated stack on the Tide Warden and kill it simultaneously with the other side's Tide Warden. Needs to be interrupted otherwise stuns random people. Beware blue circles while moving.
Will spawn Rot Jaw. Casts Bilge Slime, AOE around him. Can be healed easily. Spawns Mana Ravagers. After a while these will begin casting Mana Infusion. Drains mana and heals Rot Jaw. They need to be cleaved immedeately.
Undertow and Rot Jaw don't need to die at the same time but once they are both dead Inwar Darktide will spawn and attack. One group's tank should be ready to pick him up while the other side is finishing. Once you are done on your side you can assist the other.
Phase Three: Inwar Darktide
Inwar will spawn where you started the fight. Whichever group finished the previous first should pull him down to one side. Once the full raid can stack up behind him start DPSing him. If you start while the other group isn't finished yet you risk setting off his mechanics which require the whole raid to deal with.
Dark Tide: AOE damage on the raid. Corresponds to a debuff increasing each following Dark Tide by 10%. Serves as soft enrage.
Surge: Starts cleaving in front and in the back. Will kill everything if hit. Lasts 15 seconds.
Storm Lash: 3 second channel. Everyone hit will be lifted up into the air, take damage over time and unable to move.
Lightning Rod: Cast on 3 random people surrounding them with a small red AOE. Upon expiration deals damage to the target and more damage to anything inside. Needs a tank's guard to survive. More below.
Lightning Barrage: Circle AOE. Targets the farthest away player. Can be dodged easily.
Inwar Darktide cleaves and spawns Mana Ravagers which if alive long enough will him considerably.
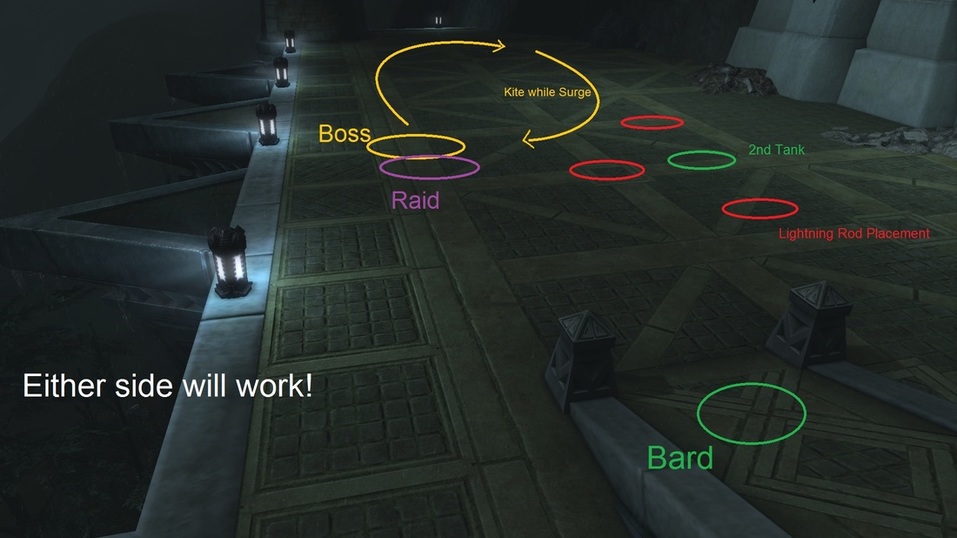
Strategy
When you are stacked up behind him have a dedicated tank standing slightly (about 15-20m) outside the raid. The bard should stay outside as well, near the steps to catch Lightning Barrage. If you get Lightning Rod you need to run towards him and spread around him carefully. You need to be in range for his guard to save you from the damage while not killing him.
When he casts Surge the raid needs to stack up on the second tank while the main tank kites him around waiting for Surge to drop again. The tank can't survive more than one hit from Surge.
Stack up again. This is usually when he casts Storm Lash. Make sure you either outrange its effect or move quickly inside the safe zone.
He will spawn Mana Ravagers. Kill them as quickly as possible. If they spawn during Surge have the second tank pick them up. Else, cleave them down while hitting the boss. If they don't die quickly they will begin casting Mana Infusion healing the boss. Can't be interrupted unless displaced (knockback).
Dark Tide: AOE damage on the raid. Corresponds to a debuff increasing each following Dark Tide by 10%. Serves as soft enrage.
Surge: Starts cleaving in front and in the back. Will kill everything if hit. Lasts 15 seconds.
Storm Lash: 3 second channel. Everyone hit will be lifted up into the air, take damage over time and unable to move.
Lightning Rod: Cast on 3 random people surrounding them with a small red AOE. Upon expiration deals damage to the target and more damage to anything inside. Needs a tank's guard to survive. More below.
Lightning Barrage: Circle AOE. Targets the farthest away player. Can be dodged easily.
Inwar Darktide cleaves and spawns Mana Ravagers which if alive long enough will him considerably.
Strategy
When you are stacked up behind him have a dedicated tank standing slightly (about 15-20m) outside the raid. The bard should stay outside as well, near the steps to catch Lightning Barrage. If you get Lightning Rod you need to run towards him and spread around him carefully. You need to be in range for his guard to save you from the damage while not killing him.
When he casts Surge the raid needs to stack up on the second tank while the main tank kites him around waiting for Surge to drop again. The tank can't survive more than one hit from Surge.
Stack up again. This is usually when he casts Storm Lash. Make sure you either outrange its effect or move quickly inside the safe zone.
He will spawn Mana Ravagers. Kill them as quickly as possible. If they spawn during Surge have the second tank pick them up. Else, cleave them down while hitting the boss. If they don't die quickly they will begin casting Mana Infusion healing the boss. Can't be interrupted unless displaced (knockback).
Useful Kalerts
Lightning Rod: needs update
Surge: needs update
Dark Tide: needs update
Surge: needs update
Dark Tide: needs update
Loot Table
The loot table is complete, but is pending beautification. Please forgive our mess.
Ring (Shared with Inquisitor Garau)
Razor Spiked Band - Warrior DPS - AP85
Ring of the Fallen Prince - Warrior Tank - GD113
Sinister Loop of Menace - Rogue DPS - AP125
Ironbound Signet - Rogue Tank - GD116
Band of Drowned Sorrow - Cleric DPS - CP183
Rune Commander's Insignia - Cleric Tank - GD109
Ancient Royal Signet - Mage DPS - CP221
Shaper's Sacred Band - Mage Tank - GD121
Feet
Dread Stompers - Warrior DPS - AP131
Blood Splattered Sabatons - Warrior Tank - GD130
Rusted Mail Boots - Cleric DPS - CP217
Greaves of the Down Trodden - Cleric Tank - GD124
Sodden Boots of Sorrow - Rogue DPS - AP123
Treads of Crushed Hope - Rogue Tank - GD123
Brine Rimmed Treads - Mage DPS - CP232
Spirit Walker's Slippers - Mage Tank - GD131
HTML Comment Box is loading comments...
