Trash Mob Encounters (Nexus Event)
Table of Contents
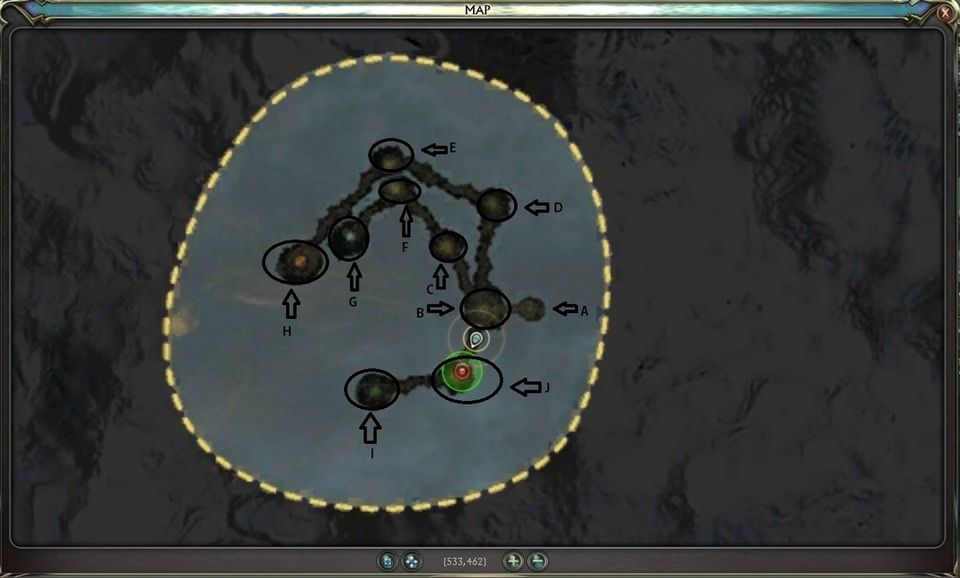
Mind of Madness Map & Legend
A - Where you port in (After killing Pagura and Lord Arak)
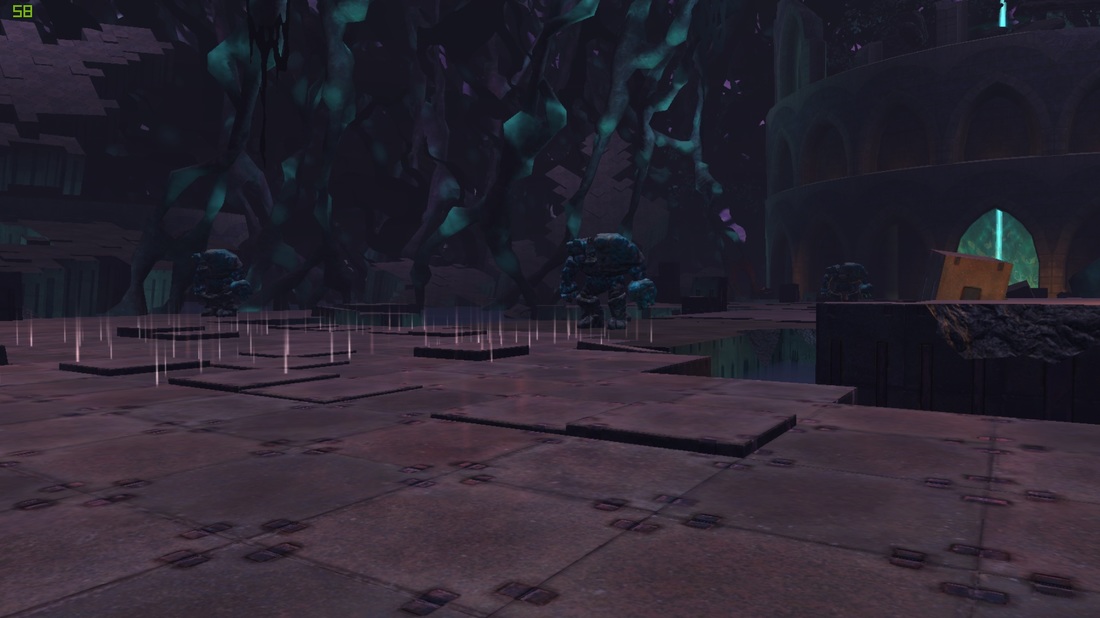
B - Nexus Ravagers/Nexus Crawlers
C - 3 Nexus Crawlers (You need 3 pulls to get these guys together for AOE)
D - Harbinger of Ruin
E - Pure Evil
F - Formless Chaos
G - Fauxmire & Enigma Entrance
H - Dark Genesis & Arisen Arak Entrance
I - Lady Envy & Dark Genesis Entrance
J - Sentinel of Reason
B - Nexus Ravagers/Nexus Crawlers
C - 3 Nexus Crawlers (You need 3 pulls to get these guys together for AOE)
D - Harbinger of Ruin
E - Pure Evil
F - Formless Chaos
G - Fauxmire & Enigma Entrance
H - Dark Genesis & Arisen Arak Entrance
I - Lady Envy & Dark Genesis Entrance
J - Sentinel of Reason
Nexus Trash (& Getting the Extra Loot)
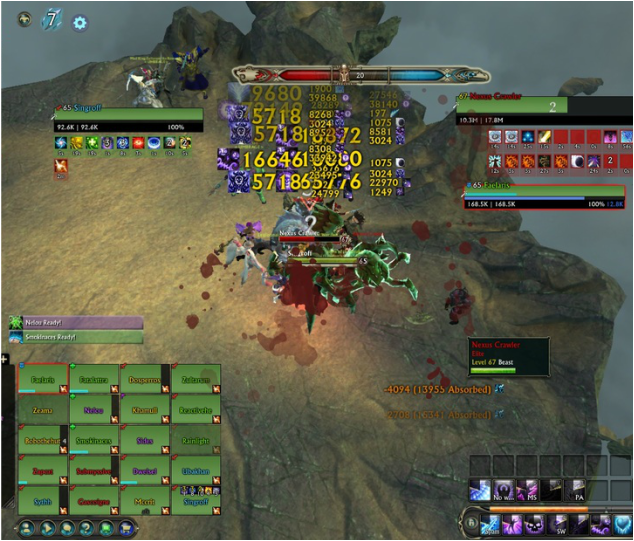
Nexus Ravager
Killing this trash in under 10 minutes awards extra loot and an achievement.
Refer to the Map above for reference to the location of these trash mobs.
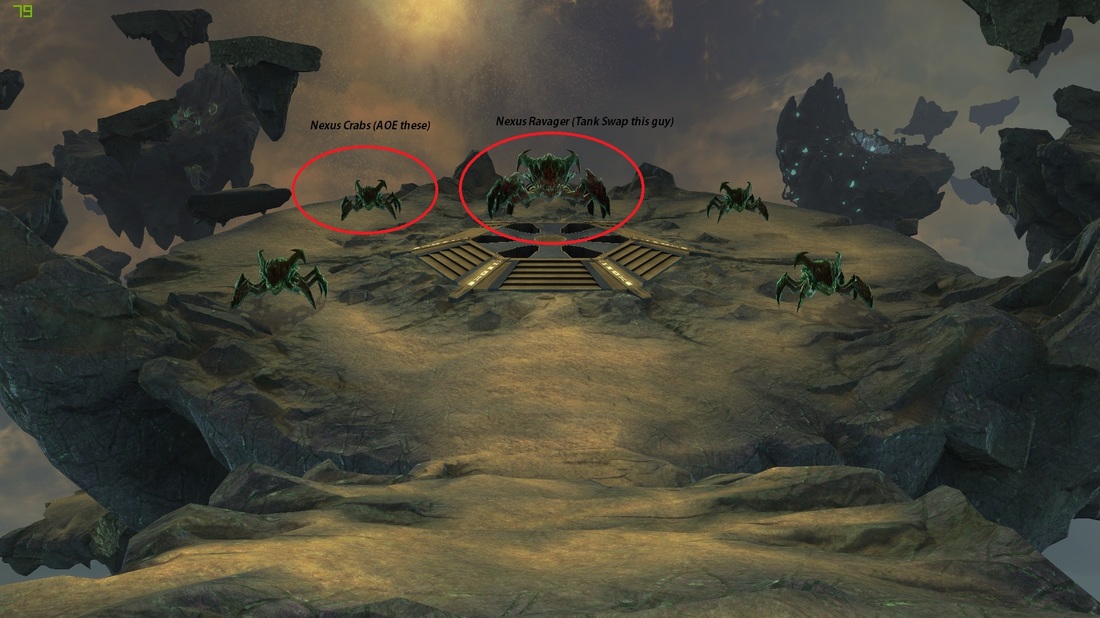
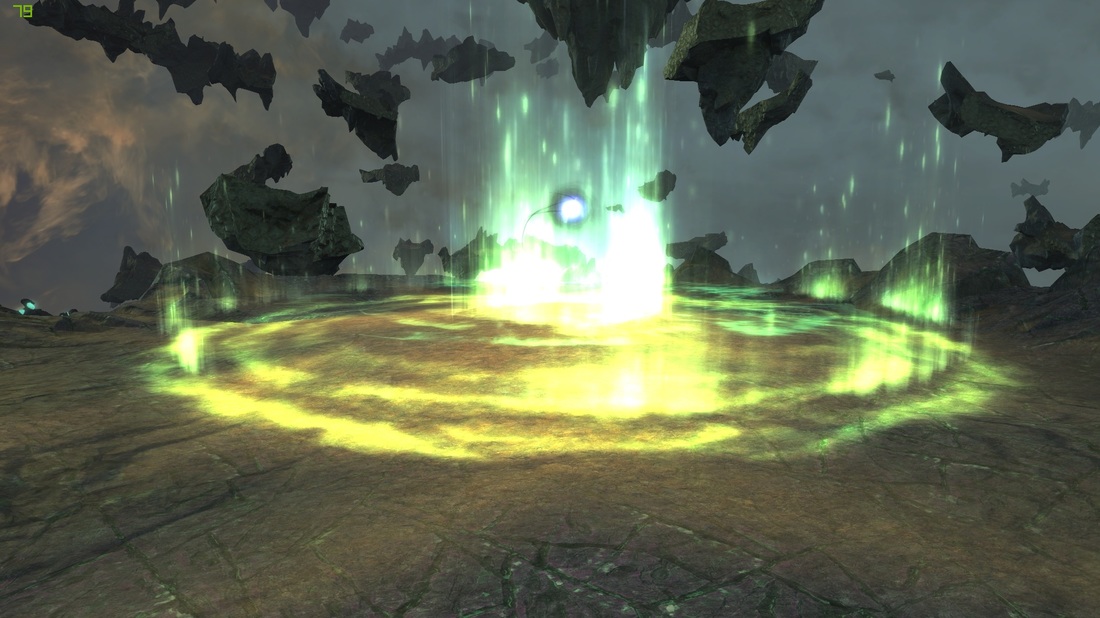
Purge Anomaly: A channel to a random player. This channel will place an AOE around the player that deals heavy AOE damage to anyone inside, so get out of it.
Tank Swap: There is a tank swap on the Ravager. This guy deals MASSIVE MASSIVE tank damage.
Everyone should be in an AOE spec or at least a spec with good cleave for this fight. Pull the adds to you.
Tank Swap: There is a tank swap on the Ravager. This guy deals MASSIVE MASSIVE tank damage.
Everyone should be in an AOE spec or at least a spec with good cleave for this fight. Pull the adds to you.
3 AOE crawlers
These crabs do tank damage and can only be pulled one at a time. Make sure you are in an aOE spec and have people to pull. Pull them together and AOE them down. The crabs are the same pictured above, except no ravager.
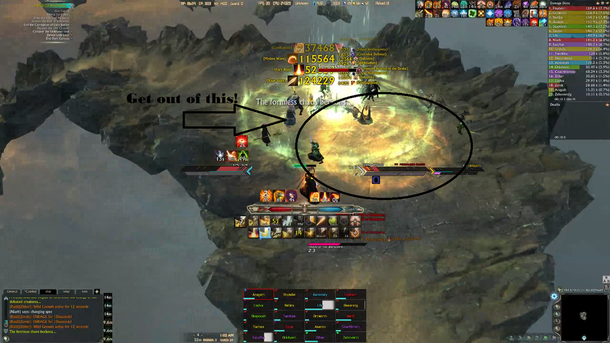
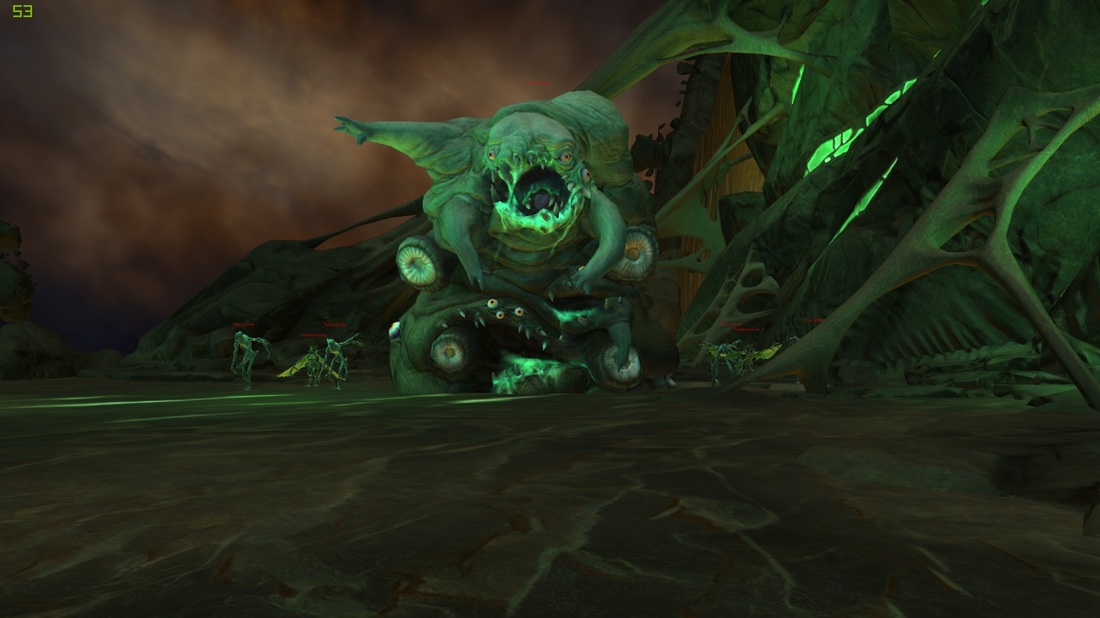
Formless Chaos
Cloak of Chaos: 5 second cast. You have until the end of the cast to turn around and stop attacking. Continuing to attack will turn the player into a cat and make them unable to attack.
Visions of the Unknown: 5 second channel. This signals that it is safe to continue attacking the add.
Fire AOE: A red bubble will spawn in a random place. After 3-4 seconds, the bubble will become a ring of fire and deal heavy damage. Get out!
Visions of the Unknown: 5 second channel. This signals that it is safe to continue attacking the add.
Fire AOE: A red bubble will spawn in a random place. After 3-4 seconds, the bubble will become a ring of fire and deal heavy damage. Get out!
Pure Evil
This add has no mechanics, no aggro, and deals no damage. You have 20 seconds to kill it (It has 35 million health). You need to have 1 bard, 1 archon/harbchon, and one beastmaster. Everyone else needs to be in their highest burst DPS spec in order to kill the add (The check is approx. 2.6 million).
Sentinel of Reason
Incarcerating Blast:This needs to be ST reflected. Will one shot a player (The tank?) in the raid.
Retribution: Heavy damage to the raid (I think; correct me if I'm wrong, someone).
You need 1 tank, your standard support, a tank healer, 1 player to reflect, and ST DPS.
Retribution: Heavy damage to the raid (I think; correct me if I'm wrong, someone).
You need 1 tank, your standard support, a tank healer, 1 player to reflect, and ST DPS.
Harbinger of Ruin
Scream of Despair: Cleansable DoT. Read Below:
This boss is ALL about the cleanses. The boss puts a cleansable DoT on members of the raid each second or two. Failure to cleanse will deal approx. 40K damage. The DoT stacks until it kills players. You need AT LEAST 5 AOE healers (Wardens are highly recommended here) for this guy, and they all need to rotate cleanses. Adding healers is better than adding DPS. Every DPS needs to be in a single target spec. You also need 1 tank.
This boss is ALL about the cleanses. The boss puts a cleansable DoT on members of the raid each second or two. Failure to cleanse will deal approx. 40K damage. The DoT stacks until it kills players. You need AT LEAST 5 AOE healers (Wardens are highly recommended here) for this guy, and they all need to rotate cleanses. Adding healers is better than adding DPS. Every DPS needs to be in a single target spec. You also need 1 tank.
Trash Preceding Bosses
Fauxmire to Enigma
There are 5 of these bad boys.
Hammer of Discord: Interrupt this. Will one shot most of the raid.
Doom: Interrupt this. One shots or something.
He will do a cast that will place 2 AOE cones on the ground. You have 2 seconds to get out of them or they knock you back. The easiest way to deal with this trash is to pull them into Fauxmire's area and have a tank constantly kite them around. They do no casts if they are constantly moving. The fifth one is too far away for this, however. You need to have someone with an AOE summon make it past the spikes and summon the raid to them.
Portal to Lady Envy
Purge: The adds and especially the worm need to be purged, as they have a shield mechanic. The easiest way to kill them fast is to cleave ST off of the worm.
Cleave: The worm cleaves. The tank should tank him sideways to the raid.
Digestive Spray: Healing channel that is unavoidable. This is why you need to cleave off of him.
Cleave: The worm cleaves. The tank should tank him sideways to the raid.
Digestive Spray: Healing channel that is unavoidable. This is why you need to cleave off of him.
Portal to Fauxmire (Lightning bugs and the Invisible Goblins)
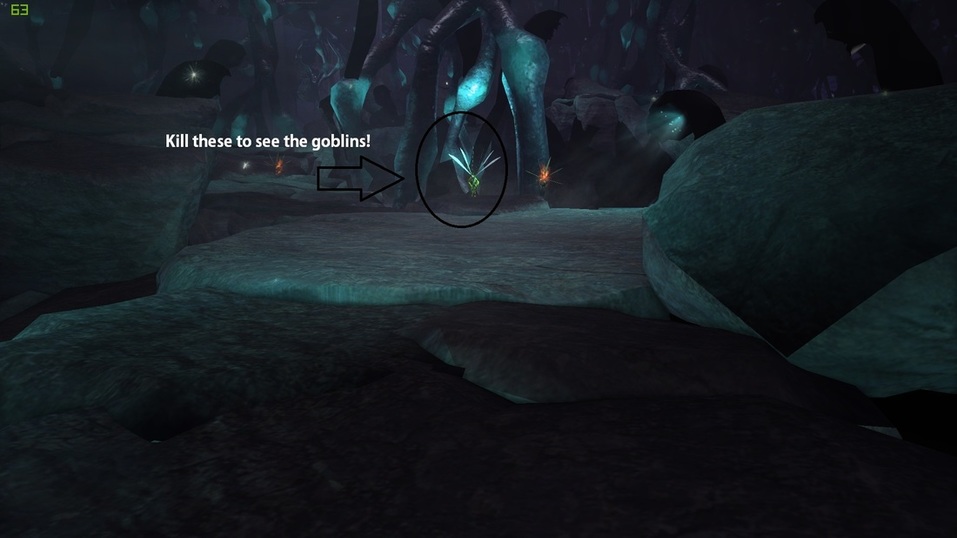
There are several INVISIBLE goblins with yellow AOEs around them. Touching these AOEs will kill you. In order to see the goblins and AOEs, you need to kill one of the fireflies around the room. There are a limited number of them. The ones in the raid are much smaller than pictured above. You can only see the little goblins for a limited time.
Portal to Pillars of Justice to Lady Justice
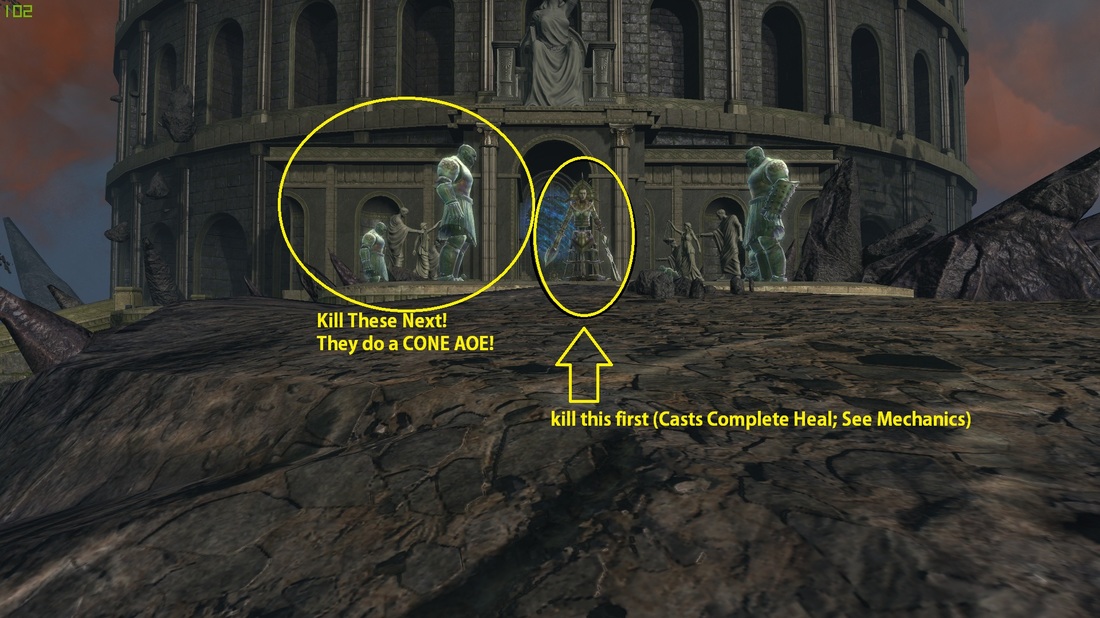
Complete Heal: Cast by the metal females. Completely heals them for 100% of their maximum HP.
Revoke: Large double cone AOE done by the circles golemns. Get out of this red as it will probably kill you.
Use some AOE specs with stuns to keep these guys from attacking as much as possible.
Revoke: Large double cone AOE done by the circles golemns. Get out of this red as it will probably kill you.
Use some AOE specs with stuns to keep these guys from attacking as much as possible.
