Rhaza'de Canyons
Boss List
King Krilladu
Boss Mechanics
Krilladu Minor: Add. When killed removes stacks of Carapce. When killed while Enraged, grants a 300% damage buff (yellow circle).
Carapace: Incoming damage reduced by 2 percent per stacks.
Krilling Floor: AOE damage.
Call of the Swarm: Interruptable cast. Heals the boss.
Be sure to stack up. When your healer struggles with keeping the group alive have him switch to AOE heal. When you engage the add in the middle, many more will spawn and the boss will spawn 20 seconds later. You can hold off on the damage until the boss arrives. One add will regularly enrage. Kill it to gain the damage buff. Kill the Krilladu Minor to remove Carapce from the boss. You can start focusing the boss once he is at ~10 stacks. Interrupt Call of the Swarm.

Shatterhorn
Boss Mechanics
Khadgak: 3 Adds. If killed applies a damage buff to the boss.
Fury: Increases outgoing damage, decreases incoming damage. Stacks every 4 seconds.
Stand Off: Gains Fury every 5 seconds unless moved.
Building Fury: Interruptable cast. Gains a stack of Fury every second.
Trembling Earth: AOE damage
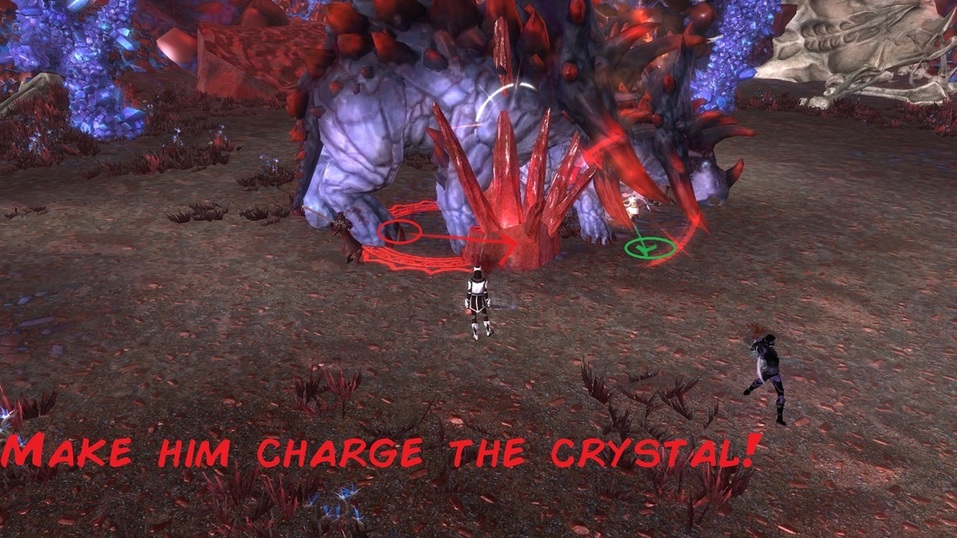
Preparing to Charge: Charges after 5 seconds. Destroys an Aethernite(blue) or Painite(red). when in the way and stuns the boss.
Shattered Aethernite: Damage every 3 seconds. Triggers on destroying an Aethernite. Interacts with the opposite crystal.
Shattered Painite: Damage every 3 seconds. Triggers on destroying a Painite. Interacts with the opposite crystal.
Keep moving in a small area to prevent Stand Off. When he prepares to charge, the tank can hide behind a crystal to stun the boss (Not necessary). If possible alternate between crystals. Interrupt Building Fury. The tank picks up the adds while the group should focus the boss. If he gets more than 5-8 stacks of Fury you can run away a little further (keep heal range in mind) to trigger Preparing to Charge.
Fury: Increases outgoing damage, decreases incoming damage. Stacks every 4 seconds.
Stand Off: Gains Fury every 5 seconds unless moved.
Building Fury: Interruptable cast. Gains a stack of Fury every second.
Trembling Earth: AOE damage
Preparing to Charge: Charges after 5 seconds. Destroys an Aethernite(blue) or Painite(red). when in the way and stuns the boss.
Shattered Aethernite: Damage every 3 seconds. Triggers on destroying an Aethernite. Interacts with the opposite crystal.
Shattered Painite: Damage every 3 seconds. Triggers on destroying a Painite. Interacts with the opposite crystal.
Keep moving in a small area to prevent Stand Off. When he prepares to charge, the tank can hide behind a crystal to stun the boss (Not necessary). If possible alternate between crystals. Interrupt Building Fury. The tank picks up the adds while the group should focus the boss. If he gets more than 5-8 stacks of Fury you can run away a little further (keep heal range in mind) to trigger Preparing to Charge.
Mithe Tethson
Boss Mechanics
Bite: Interruptable cast. Damages the target (tank) for 80% health.
There are 6 chambers. At 80% and 40% he will unleash two of the adds inside. Depending on which adds you get, you have to adjust your strategy.
Basililly (Raptor): Searing Wave. Debuff on the group. Cleanse. Deals damage.
Brawjok (Golem): Breaks up into smaller units (Brwabits). DPS them down quickly. Also reflects ranged damage.
Sepira (space wale): Interrupt!
Killpit (Wolf): Interrupt!
Fwil (Spider): Interrupt and DPS adds.
Arhee (Krill): Interrupt!
The tank should always interrupt Bite. The group can stack up. The red bubble appearing will do nothing. Follow the instructions above in dealing with the adds. They should be focused down!
Khadluu Khan
Boss Mechanics
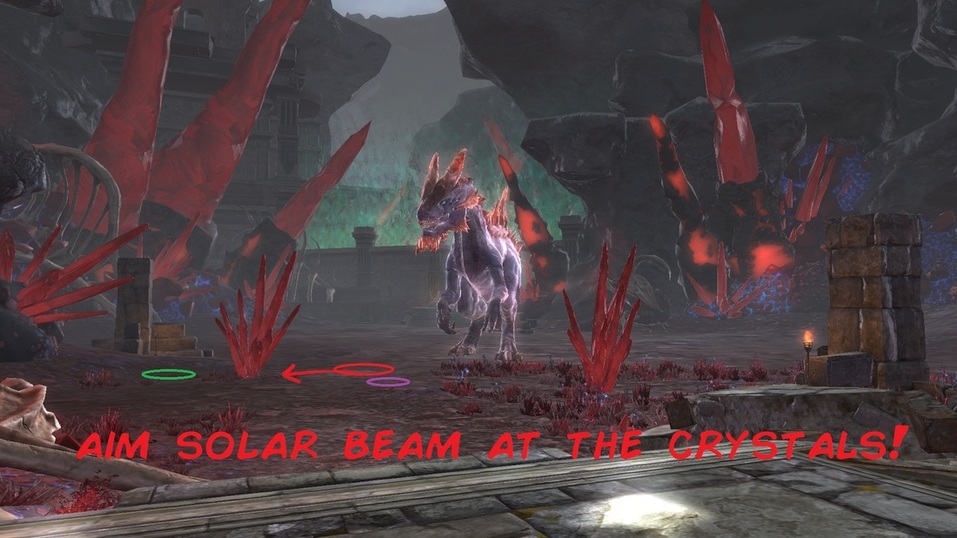
Gathering Energy: Prepares a Solar Beam. Hide behind a crystal.
Solar Beam: Deals lethal damage over 3 seconds. If you LOS behind a crystal, it will catch it for you.
Ruby Flash: 2 second cast. Deals damage to anyone who is not faced away.
Rampage: Increases outgoing damage by 500%. Applied after Solar Beam. Drops after Murderous Lunge.
Earthshattering Roar: Deals damage.
Murderous Lunge: Charges a player. Causes Falling Debris (damage) around the target.
Tail Sweep: Cleaves to the back and applies a debuff. Cleanse immedeately.
Stack up on his side (excluding tank) to avoid Tail Sweep. If a player stands more than 20m away from him he will charge them (so stay close). When he casts Gathering Energy, the tank has to run behind a crystal (there are four) and redirect the beam onto it. They will interconnect with lasers (stay out). He will gain Rampage and kill the tank if you don't get rid of it. To do that make sure he uses Murderous Lunge (by standing away from him, or hiding behind the stone pillars). Turn around on Ruby Flash. The fight can be quite chaotic, make sure you're staying within the healer's range.
Teth Mornta
Boss Mechanics
Twisted Ascension: His health cannot be reduced past 30%. Removed by the beam.
Great Cleave: His attacks cleave. Stay behind him.
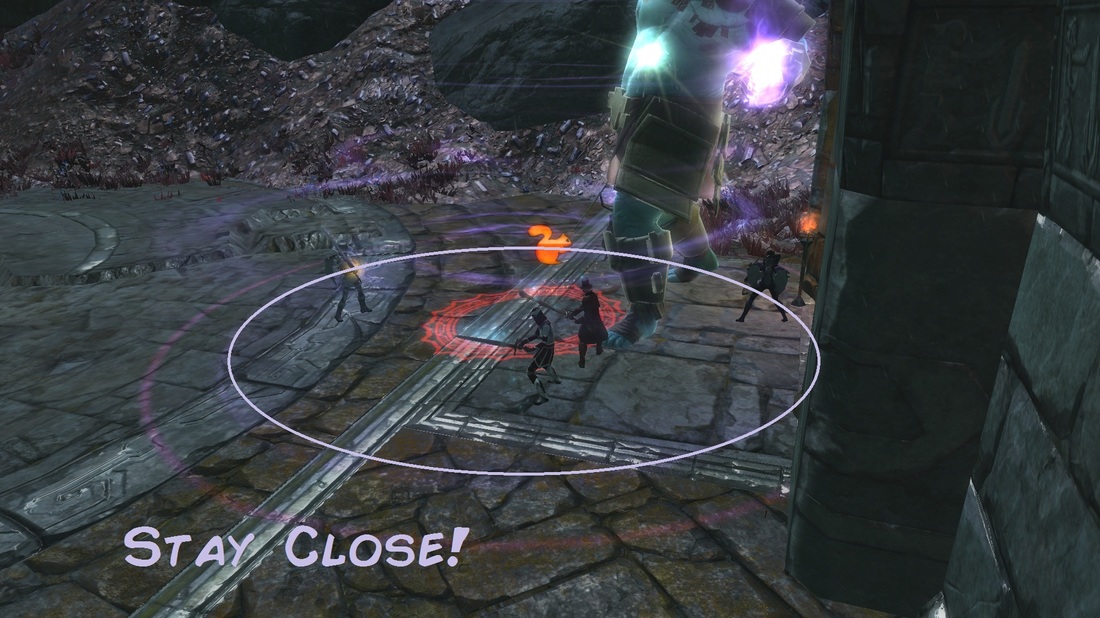
Soul Rip: Deals lethal damage to anyone not inside the safe zone (purple circle).
Chains of Teth: Roots. Cleansable. Also removed by charging him or anything that breaks CC.
Spiritual Abyss: AOE. Move out.
Death Sentence: Kills the target upon expiration. Cleansable.
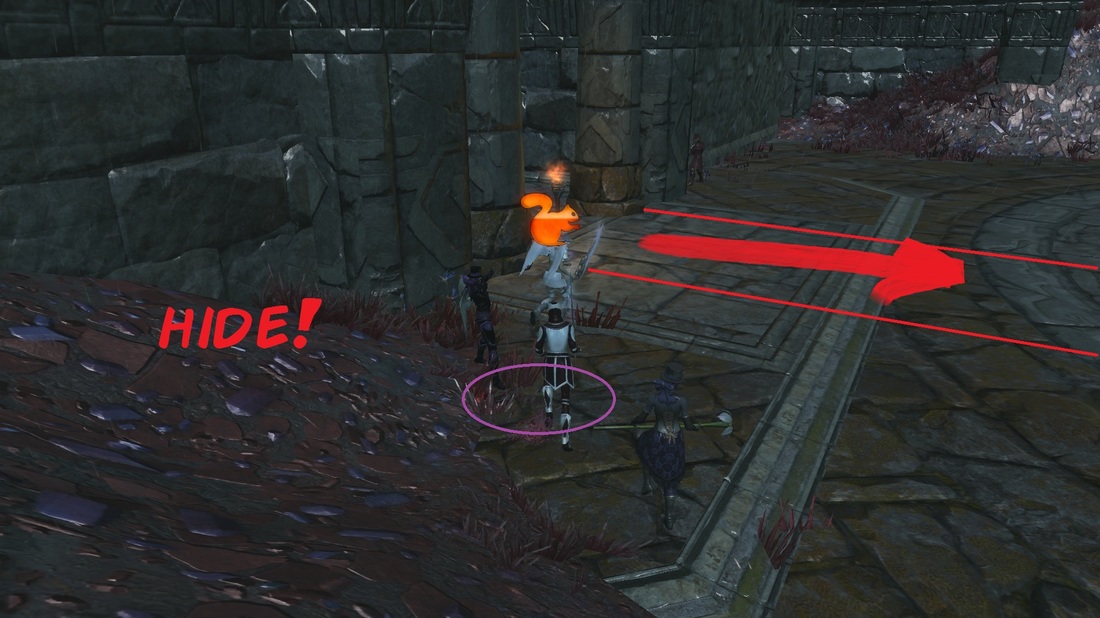
Shatter Reality: Kills anyone in sight at the end of the cast. Enflames the room it's cast in!
Fracturing Soul: Deals damage every second and increases itself by 5% per stack. Starts at 40% health.
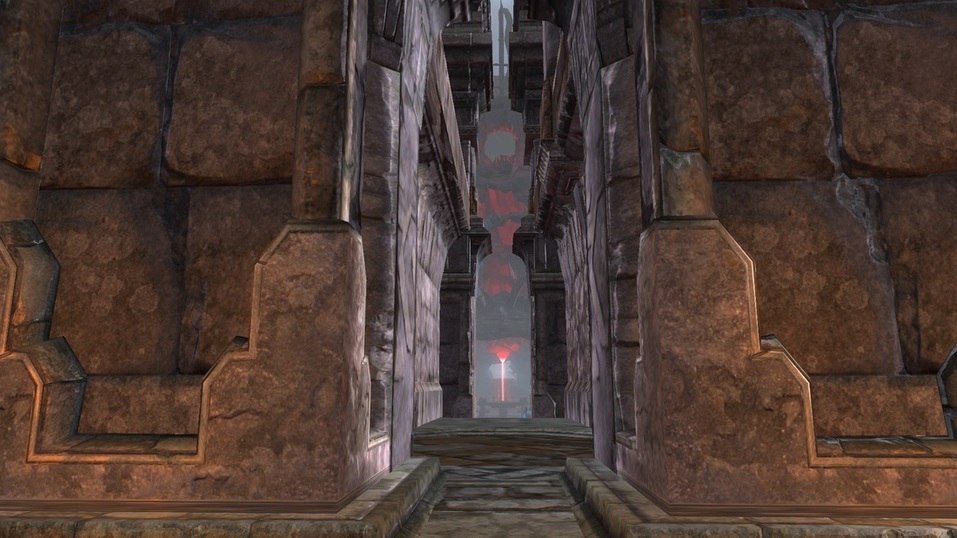
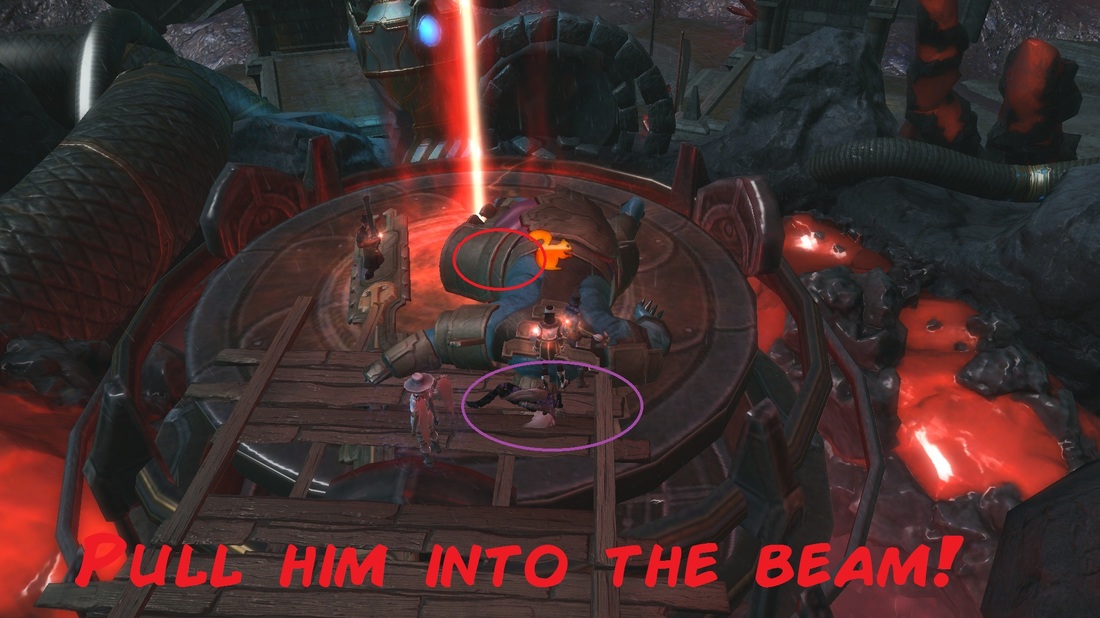
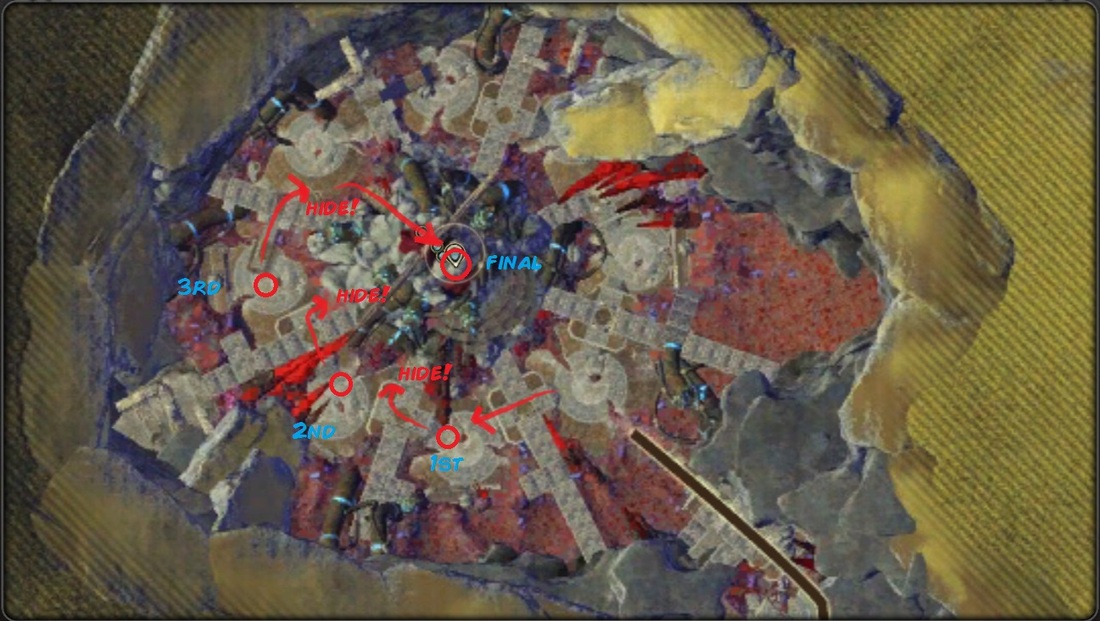
The ultimate goal of this fight is to pull him into the red beam at the top of the map through the small rooms (doesn't matter if clock or anti-clockwise) - see last picture.
You will need to play his other mechanics and pull him from room to room. Depending on your DPS you can skip one or two of them.
In every room start by pulling him close to the middle. Stack up behind him (except the tank) because he cleaves. Move when he drops Spiritual Abyss (blue bubble). Be sure to stand in the purple circle on Soul Rip. Cleanse Chains of Teth and Death Sentence immedeately to avoid them overlapping with movement mechanics (Shatter Reality). You should be near to the next room when he begins Shatter Reality. Run through to the next room and hide behind the wall (left or right). Repeat.
At 40% the group will begin taking more and more damage. You should be at the stairs by now.
Pull him to the base of the stairs or even halfway up. You can LOS Shatter Reality with them too. When you're at the top level of the area you can pull him straight to the beam (stay in healer's range) assuming you just had a Shatter Reality. Pull the boss inside the beam to remove Twisted Ascension. The group will take high damage every second. He will still use the Soul Rip mechanics.
Great Cleave: His attacks cleave. Stay behind him.
Soul Rip: Deals lethal damage to anyone not inside the safe zone (purple circle).
Chains of Teth: Roots. Cleansable. Also removed by charging him or anything that breaks CC.
Spiritual Abyss: AOE. Move out.
Death Sentence: Kills the target upon expiration. Cleansable.
Shatter Reality: Kills anyone in sight at the end of the cast. Enflames the room it's cast in!
Fracturing Soul: Deals damage every second and increases itself by 5% per stack. Starts at 40% health.
The ultimate goal of this fight is to pull him into the red beam at the top of the map through the small rooms (doesn't matter if clock or anti-clockwise) - see last picture.
You will need to play his other mechanics and pull him from room to room. Depending on your DPS you can skip one or two of them.
In every room start by pulling him close to the middle. Stack up behind him (except the tank) because he cleaves. Move when he drops Spiritual Abyss (blue bubble). Be sure to stand in the purple circle on Soul Rip. Cleanse Chains of Teth and Death Sentence immedeately to avoid them overlapping with movement mechanics (Shatter Reality). You should be near to the next room when he begins Shatter Reality. Run through to the next room and hide behind the wall (left or right). Repeat.
At 40% the group will begin taking more and more damage. You should be at the stairs by now.
Pull him to the base of the stairs or even halfway up. You can LOS Shatter Reality with them too. When you're at the top level of the area you can pull him straight to the beam (stay in healer's range) assuming you just had a Shatter Reality. Pull the boss inside the beam to remove Twisted Ascension. The group will take high damage every second. He will still use the Soul Rip mechanics.
VIDEO
