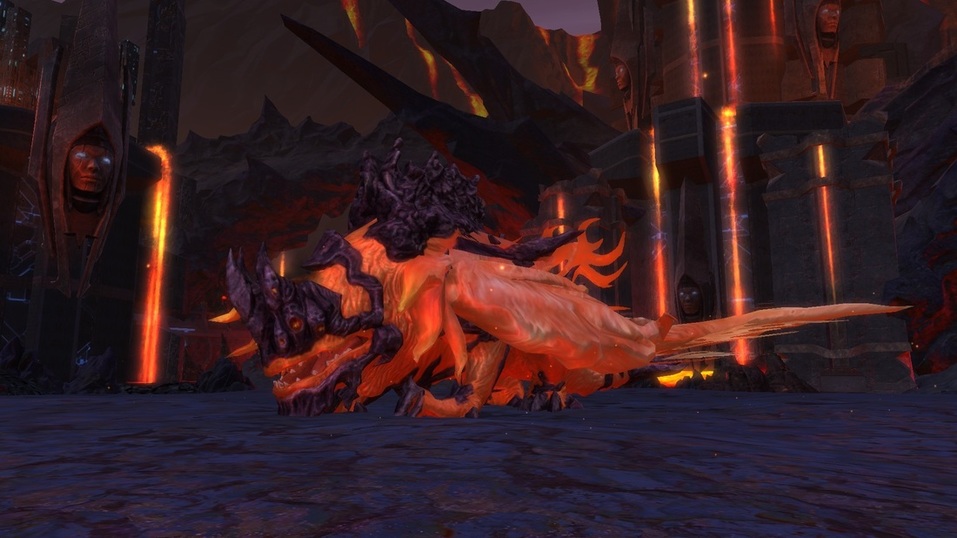
Fyragnos
Boss Information
Health: 79.95 (EM) - 159.9M (NM) - 207.9M (HM) (All 5/27/2016)
Enrage: 8:30-9 minutes (5/18/2016)
Difficulty: 6/10
Required DPS: 115K per person (Need a bit of cleave for the add phase)
Enrage: 8:30-9 minutes (5/18/2016)
Difficulty: 6/10
Required DPS: 115K per person (Need a bit of cleave for the add phase)
Setup
- 1-2 Tanks
- 1 Tank Healer
- 1 Raid Healer
- 1 Bard or Oracle
- 1 Archon or Beastmaster
- 4-5 DPS (Good ST/Cleave)
Phase 1: The Ground Phase
Boss Mechanics
This is a dragon and follows MMO dragon standards. Alternates between a ground and add phase. His hit box is huge. He flies up during the add phase.
Searing Breath: Frontal fire cone cleave. Avoid.
Tail Swipe: Back cleave. Avoid. One shots players.
Withering Blaze: Emote "[Player] is suffering From the Flames of Wrath!". Use healing CDs or a tank intercept on the player. It is not cleansable.
Inferno Blast: Enflames his feet. AOE damage on the raid. Heal through or stand at the edge of his wings to range it.
Magma Burst: (<50%) Lava shoots up from the ground. One shots. Move out! 1-3 players will be disoriented (cleansable).
Summon Flamestorm: (NM/HM) Summons a red AOE circle on a player. Starts moving around after 3 seconds. Move out!
Shackles of Ash: (HM) AOE on one player. One shots anyone in range. Move out!
Flame of Despair: Cleanse mechanic. Stuns.
Bane of Fyragnos (HM only, <10%): One shots a random player unless intercepted. You have 1 second to intercept, and it will happen again before your intercept is off cooldown. either use puri healing CDs or have rezzes for players hit by this.
Phase 2: The Add Phase
Boss Mechanics
Call of the Drake: Triggers add phase. Spawns Lava Drakes. Flies up.
Lava Drake: CLEAVES (cone). Uses Magma Blast.
Magma Blast: Frontal AOE.
Ashen Claw. Cleanse mechanic. Deals Damage. Cleanse!
Fiery death beam from the sky: (HM only) Kills players near the target. Run out!
Lava Drake: CLEAVES (cone). Uses Magma Blast.
Magma Blast: Frontal AOE.
Ashen Claw. Cleanse mechanic. Deals Damage. Cleanse!
Fiery death beam from the sky: (HM only) Kills players near the target. Run out!
Strategy
Choose between two ways of positioning the raid. Either have the group stacked on either of his (front) feet or spread evenly. Stacking ensures that no one accidentally eats one of the cleaves and everyone is in intercept range but requires more movement and awareness of what's going on. Spreading eases on the movement but requires more awareness of positioning to not eat the cleaves and still be in intercept range.
If you chose to stack, turn by roughly 90° every Summon Flamestorm (and sub 50% for Magma Burst). The raid sticks to his foot moving along.
If you chose to spread, move away from Summon Flamestorm, don't stand behind and in front of the boss and be ready to strafe towards the tank for the intercept (or have the healers take extra care of that).
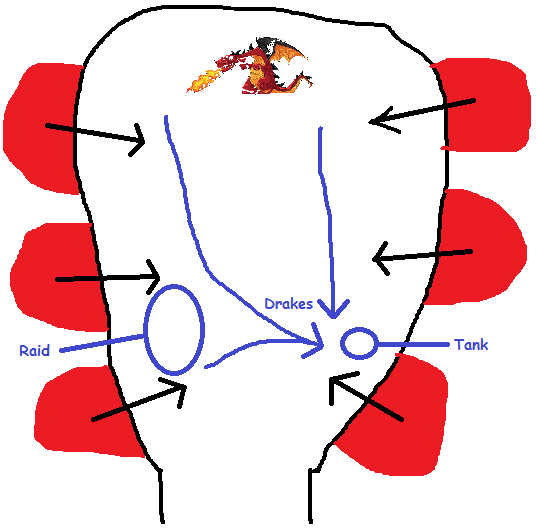
When he flies up 4 Lava Drakes will spawn. On EM/NM the group can do 2 while the tank picks up the other two and waits for the group to return. The tank needs almost no healing during this phase so the healers can focus on whoever has the aggro of the other two. Or have the tank pickup all Drakes and then kill them (use the picture provided). Either way always turn them away from the group. They do not stack very well, so expect their cleaves to go off in random directions. Be ready to run while the tank picks everything up. DPS them while cleansing their debuff. Avoid Flamestorms (and Beam of Fiery Death on HM) If you're having problems keeping them under control and people getting killed you can use a second tank if the DPS check isn't tight (basically just easy mode). Once the adds are dead the boss will come down again.
Reposition and repeat. At 50% until the end he will use Magma Burst. Be sure to cleanse Flame of Despair immediately so people can move out.
Mind the HM mechanics.
If you chose to stack, turn by roughly 90° every Summon Flamestorm (and sub 50% for Magma Burst). The raid sticks to his foot moving along.
If you chose to spread, move away from Summon Flamestorm, don't stand behind and in front of the boss and be ready to strafe towards the tank for the intercept (or have the healers take extra care of that).
When he flies up 4 Lava Drakes will spawn. On EM/NM the group can do 2 while the tank picks up the other two and waits for the group to return. The tank needs almost no healing during this phase so the healers can focus on whoever has the aggro of the other two. Or have the tank pickup all Drakes and then kill them (use the picture provided). Either way always turn them away from the group. They do not stack very well, so expect their cleaves to go off in random directions. Be ready to run while the tank picks everything up. DPS them while cleansing their debuff. Avoid Flamestorms (and Beam of Fiery Death on HM) If you're having problems keeping them under control and people getting killed you can use a second tank if the DPS check isn't tight (basically just easy mode). Once the adds are dead the boss will come down again.
Reposition and repeat. At 50% until the end he will use Magma Burst. Be sure to cleanse Flame of Despair immediately so people can move out.
Mind the HM mechanics.
Kill Videos
Easy Mode courtesy of Discordya. LINK
Normal Mode from Mielikki of GreyGuard. LINK
World First Hard Mode courtesy of Sahtiaro or Kalim'na. LINK
Normal Mode from Mielikki of GreyGuard. LINK
World First Hard Mode courtesy of Sahtiaro or Kalim'na. LINK
Loot Table
|
Easy Mode:
Earrings Nascent Ornament of Searing - STR/AP Nascent Fyragnos Bauble - WIS/SP Nascent Sigil of Dispair - DEX/AP Nascent Sigil of Lava - INT/SP Belts Nascent Waistplate of Fury - STR/CP Nascent Lord's Belt - WIS/CP Nascent Sash of Fervor - DEX/AP Nascent Cord of Fate - INT/SP *Earrings and Belts sidegrade to guard |
Normal Mode:
Broken Cosmos Shoulders Empowered Lava Seared Shoulderplates - STR/CP Empowered Magma-Proof Shoulderguards - WIS/CP Empowered Spaulders of Flame - DEX/CP Empowered Shoulderwraps of Fyragnos - INT/CP Legs Empowered Fyragnos Legplates - STR/CP Empowered Legguards of Ahnket - WIS/CP Empowered Flamestrom Leggings - DEX/CP Empowered Ashen Britches - INT/CP *Shoulders and Legs sidegrade to guard |
Hard Mode:
Normal Mode loot plus one of the below and a Tower Sigil (All bosses but Lord Fionn appear to have this as their HM loot table.) Capes (Sidegrade to Block Hellion's Cape - STR/AP Ducal Cape - WIS/SP Blazing Drapes - AGI/AP Shroud of Eblius - INT/SP Ring (Sidegrades as shown) Ahnket Band - STR/CP (Dodge) Beseiger's Hoop - STR/AP (Guard) Lifewrought Ring - WIS/CP (Dodge) Ring of the Tower Sentinel - WIS/SP (Guard) Band of Hericius - DEX/CP (Dodge) Sporific Loop - DEX/AP (Guard) Soothseer Loop - INT/CP (Dodge) Fungal Band - INT/SP (Guard) Earring (Sidegrades as shown) Inferno Hoop - STR/CP (Block) Ornament of Searing - STR/PC (Block) Whithering Loop - WIS/CP (Block) Fyragnos Bauble - WIS/SCH (Guard) Sigil of Despair - DEX/PC (Guard) Ornament of Ahnket - DEX/CP (Block) Sigil of Lava - INT/SCH (Guard) Flamecast Earring - INT/CP (Block) |
HTML Comment Box is loading comments...
