Grugonim
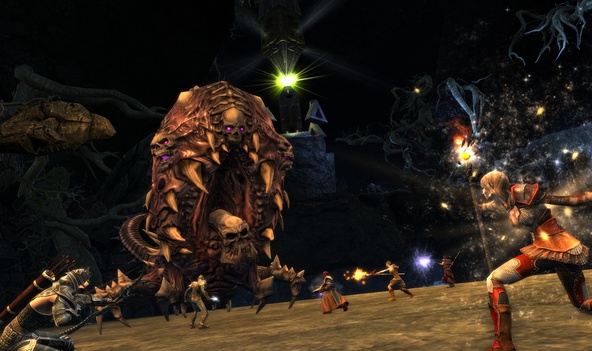
Boss Information
Health: 728.2 M (5/4/16)
Difficulty: 8/10
Enrage Timer: 13 Minutes
Required DPS: ~1.2 Million
Difficulty: 8/10
Enrage Timer: 13 Minutes
Required DPS: ~1.2 Million
Raid Setup
- 2 Tanks
- 1 ST Healer
- 2-3 Raid Healers
- 1 Bard/Oracle
- 1 Archon
- 1 Beastmaster (optional)
- 11-13 DPS
Phase One: 100-50%
Boss Mechanics
He will alternate between his regular mechanics and an underground phase.
Bloodplague Crawler (ant): Add mechanic. Grants a stack of Bloodplague Essence on death.
Bloodplague Essence: Stacking buff. Increases damage each stack. Lasts 50 seconds.
The Bloodplague Crawlers will spawn throughout the entire fight. Managing and maintaining the damage buff by killing them is key to completing the encounter. Maintain this buff all the time.
Above ground
Tail Lash: Back cleave.
Necrotic Breath: 1.5 second cast followed by 6s channel. Frontal cleave mechanic. The tank eats this.
Nerve Damaging Poison: Swap mechanic. Reduces max Hp by 10% per stack. Swap at 4-5 stacks. Damage portion of the same name.
Rampant Decay: Debuff on random player. Drops AOE on the ground.
Seismic Disruption: Knockback. Grugonim burries himself underground and knocks the raid back. Triggers Underground Phase.
Underground Phase
Corrosive Ooze: AOE left behind by Grugonim.
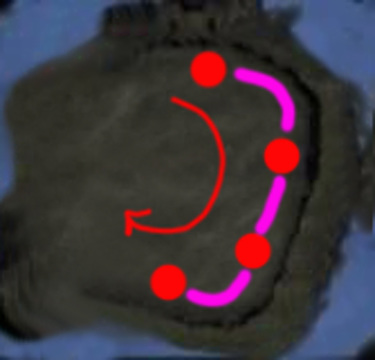
Following Seismic Disruption the boss will go underground and leave a purple AOE trail - Corrosive Ooze - ("lane"). You need to kite him in a straight line to avoid and drop the AOE trail. If you are too close he will do a knockback (and you get damaged by the purple AOE) but if you are too far away he will charge at that player killing everyone behind him. Stack up on the tank and move slowly in a straight line. See below for just one example of how to drop the lanes.
Strategy
The tank needs to face him away from the raid and eat Necrotic Breath. The raid and second tank should stack up on his side. When Rampant Decay hits move through the boss to his other side. Have the inactive tank pick up the ants. Before Seismic Disruption the tanks needs to turn him towards the raid so everyone gets knocked back. Proceed through each underground phase as described above until the boss reaches 50%.
Bloodplague Crawler (ant): Add mechanic. Grants a stack of Bloodplague Essence on death.
Bloodplague Essence: Stacking buff. Increases damage each stack. Lasts 50 seconds.
The Bloodplague Crawlers will spawn throughout the entire fight. Managing and maintaining the damage buff by killing them is key to completing the encounter. Maintain this buff all the time.
Above ground
Tail Lash: Back cleave.
Necrotic Breath: 1.5 second cast followed by 6s channel. Frontal cleave mechanic. The tank eats this.
Nerve Damaging Poison: Swap mechanic. Reduces max Hp by 10% per stack. Swap at 4-5 stacks. Damage portion of the same name.
Rampant Decay: Debuff on random player. Drops AOE on the ground.
Seismic Disruption: Knockback. Grugonim burries himself underground and knocks the raid back. Triggers Underground Phase.
Underground Phase
Corrosive Ooze: AOE left behind by Grugonim.
Following Seismic Disruption the boss will go underground and leave a purple AOE trail - Corrosive Ooze - ("lane"). You need to kite him in a straight line to avoid and drop the AOE trail. If you are too close he will do a knockback (and you get damaged by the purple AOE) but if you are too far away he will charge at that player killing everyone behind him. Stack up on the tank and move slowly in a straight line. See below for just one example of how to drop the lanes.
Strategy
The tank needs to face him away from the raid and eat Necrotic Breath. The raid and second tank should stack up on his side. When Rampant Decay hits move through the boss to his other side. Have the inactive tank pick up the ants. Before Seismic Disruption the tanks needs to turn him towards the raid so everyone gets knocked back. Proceed through each underground phase as described above until the boss reaches 50%.
Phase Two: 50%-10%-0%
Boss Mechanics
Upon reaching 50% he will burry himself once again. Four death spires (idols) will spawn around the room.
Manifested Death: Idol. ~20million HP each. Casts Death Beam, Necrotic Immolation and Death Bolt.
Death Beam: Interruptable cast. Deals damage. Interrupt.
Necrotic Immolation: Deals damage 20m around the Manifested Death. Avoid standing too close.
Death Bolt: Deals damage.
Parasite Swarm: AOE debuff on the raid. Reduces max Hp by 4% per stack. Deals damage (Flesh Eating Parasites).
Strategy
Make sure Grugonim is facing away from the raid once this phase starts. He will continue casting Necrotic Breath after he reemerges soon after. Stack up once again and start killing the death spires maintaining interrupts and a safe distance (or move out on Necrotic Immolation). There will be intense AOE damage during this phase. Move from each icon to the next. As soon as the last one dies the boss will be active again. Make sure one of the tanks is ready to pick him up.
He will gain an additional ability and resume his Phase One mechanics (including Underground Phases).
Corrosive Bile: AOE on two players. Move out quickly. Similar to Rampant Decay.
Reaching 10% he will spawn the Manifested Deaths again. Proceed with killing them all to have him become active again. The AOE healing required is especially challenging during this final phase of the fight.

Loot Table
The loot table is complete, but is pending beautification. Please forgive our mess.
2 Drops
Ranged (Shared with Soulrender Zilas)
Rifle of the Lost Prince - Warrior DPS - AP170
Corrupted Runeguard Cannon - Warrior Tank - GD191
Cracked Dwarven Femur - Cleric DPS - SP170
Elusive Slipstream - Cleric Tank - GD180
Striker's Ally - Rogue DPS - AP169
Sawed-Off Boomer - Rogue Tank - GD189
Baton of Shades - Mage DPS - SP170
Impure Shaper's Truncheon - Mage Tank - GD189
Chest
Hauberk of Umbra Waves - Warrior DPS - CP297
Runemender's Ritual Cuirass - Warrior Tank - GD164
Vestments of greed - Cleric DPS - SP162
Chain Tabard of Duty - Cleric Tank - GD182
Chetguard of Endless Night - Rogue DPS - CP315
Tunic of Drowned Souls - Rogue Tank - GD186
Raiment of the Underdark - Mage DPS - SP180
Shroud of the Fallen - Mage Tank - GD151
HTML Comment Box is loading comments...
